Google Analytics WordPress Setup: The Ultimate Guide 2025
Learn how to set up Google Analytics on your WordPress site with our comprehensive guide in 2025. Step-by-step instructions, tips, and best practices to track your website's performance effectively.
Table of Contents
-
Why Add Google Analytics to WordPress?
It's a free tool from Google that measures your website's effectiveness. It provides data about user interaction with your site and gives information on how to create your audience's behavior. This may give you greater insights by which you can optimize your site, enhance user experiences, and maximize conversion rates. With WordPress integration for Google Analytics comes the following benefits:
Visitor tracking - get vital information regarding your site visitors, including their geographic location, device used, browser type, and many more. Audience understanding so that you can fine-tune content or marketing efforts to your target.
User Behavior Analysis: Google Analytics gives you insight into how users behave on your website. Know which pages are most popular, how users navigate through your site, and where they drop off. You can use this information to make your user experience better.
Content Performance Tracking: Understand how well your web content is performing. Learn the popular content and the time users spend on certain pages. Use this data to keep your visitors engaged for longer.
Conversion Tracking: Be it sales, leads, or any other actions by the users that you wish to encourage; conversion tracking is going to show you how well your site is doing.
E-commerce Analytics: Is your WordPress an eCommerce site? Learn all about your e-commerce transactions, from product performance to the effectiveness of your online store.
Custom Reports and Dashboards: Set up custom reporting to track KPIs that matter to your business (e.g., Bounce Rate, New Users, Session Conversion Rate, etc.). Some SEO KPIs one should consider tracking include the following:
- Conversions
- Customer lifetime value
- Cost per acquisition
- Return on Investment (ROI)
- Organic visibility
- Organic sessions
- Brand versus non-brand traffic
- Keyword rankings
- Google Business profile metrics
- Backlinks
- Organic click-through rate
- User Engagement
SEO Insights: Use Google Analytics in conjunction with Google Search Console to get the performance of your site. Track the ranking keywords, CTR and find opportunities for WordPress SEO.
Segment Your Audience: The process of dividing an audience into smaller segments is called audience segmentation. These could be custom audience segments based on some characteristic, behavior, or demographic of the users. Once you have them created, you can personalize your marketing efforts for each target audience. Generally, one can segment customers based on geographic, psychographic, behavioral, demographic, media, and benefit conditions.
Data-Driven Decision Making: Make data-driven decisions regarding your website, content strategy, and marketing with in-depth data analytics. Learn what works best and what to improve.
-
How to Add Google Analytics to WordPress
There are several ways to set up Google Analytics for WordPress. You could use the Integrations tool available with WordPress, then there is using a plugin like Site Kit, or you could manually insert the Google Analytics tracking code in your WordPress theme file. And the best one largely depends upon your WordPress plan.
Below we'll outline which plan allows you to use each process.
Don't be intimidated by the thought of editing your website's code. It is quite easy. You can't break anything if you follow the instructions.
-
Step 1: Create a Google Analytics 4 Account
Before you can connect Google Analytics to your WordPress site, you'll need to set up a Google Analytics 4 account.
Create a Google Analytics 4 Account
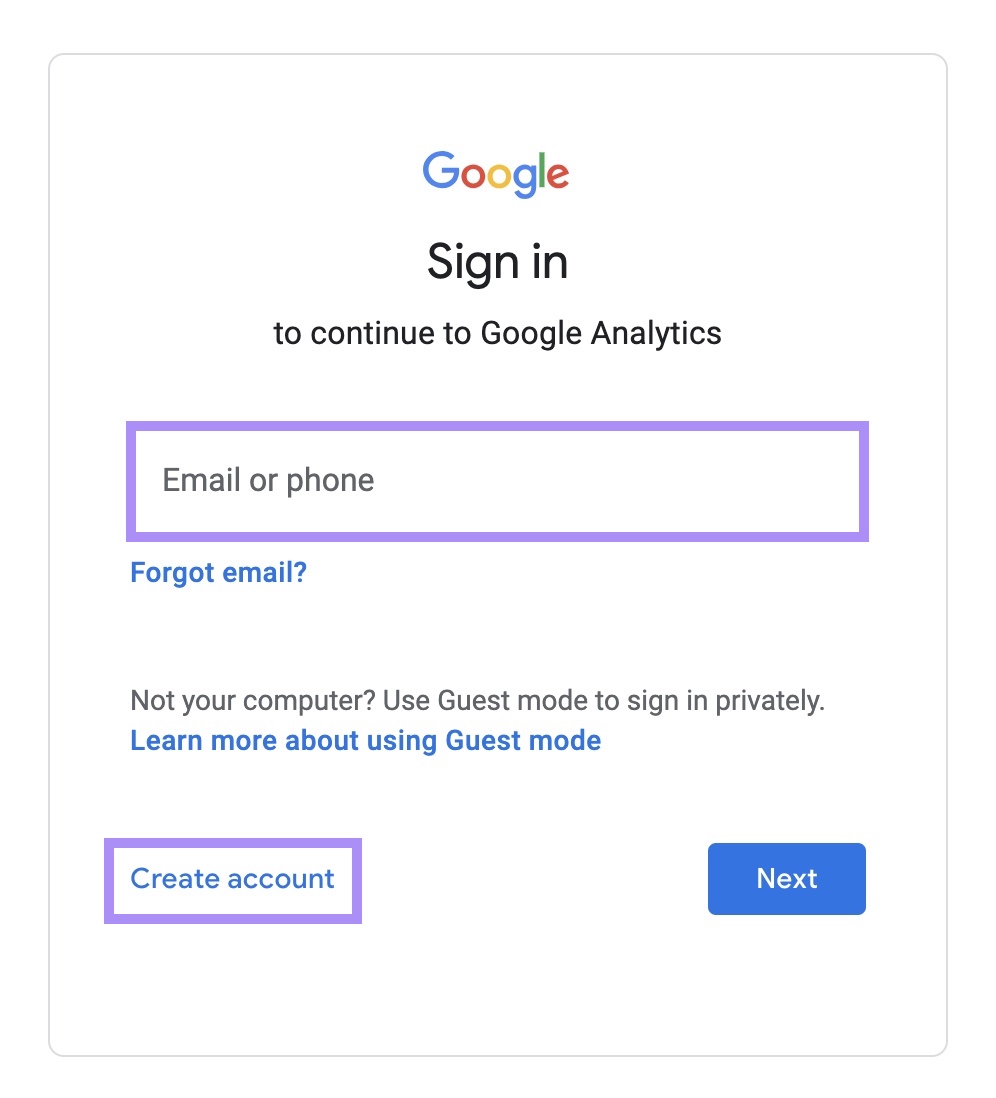
Go to the Google Analytics website.
Sign in with your Google account. If you don’t have one, click “Create account” and follow the instructions. Then sign in with your new account details.
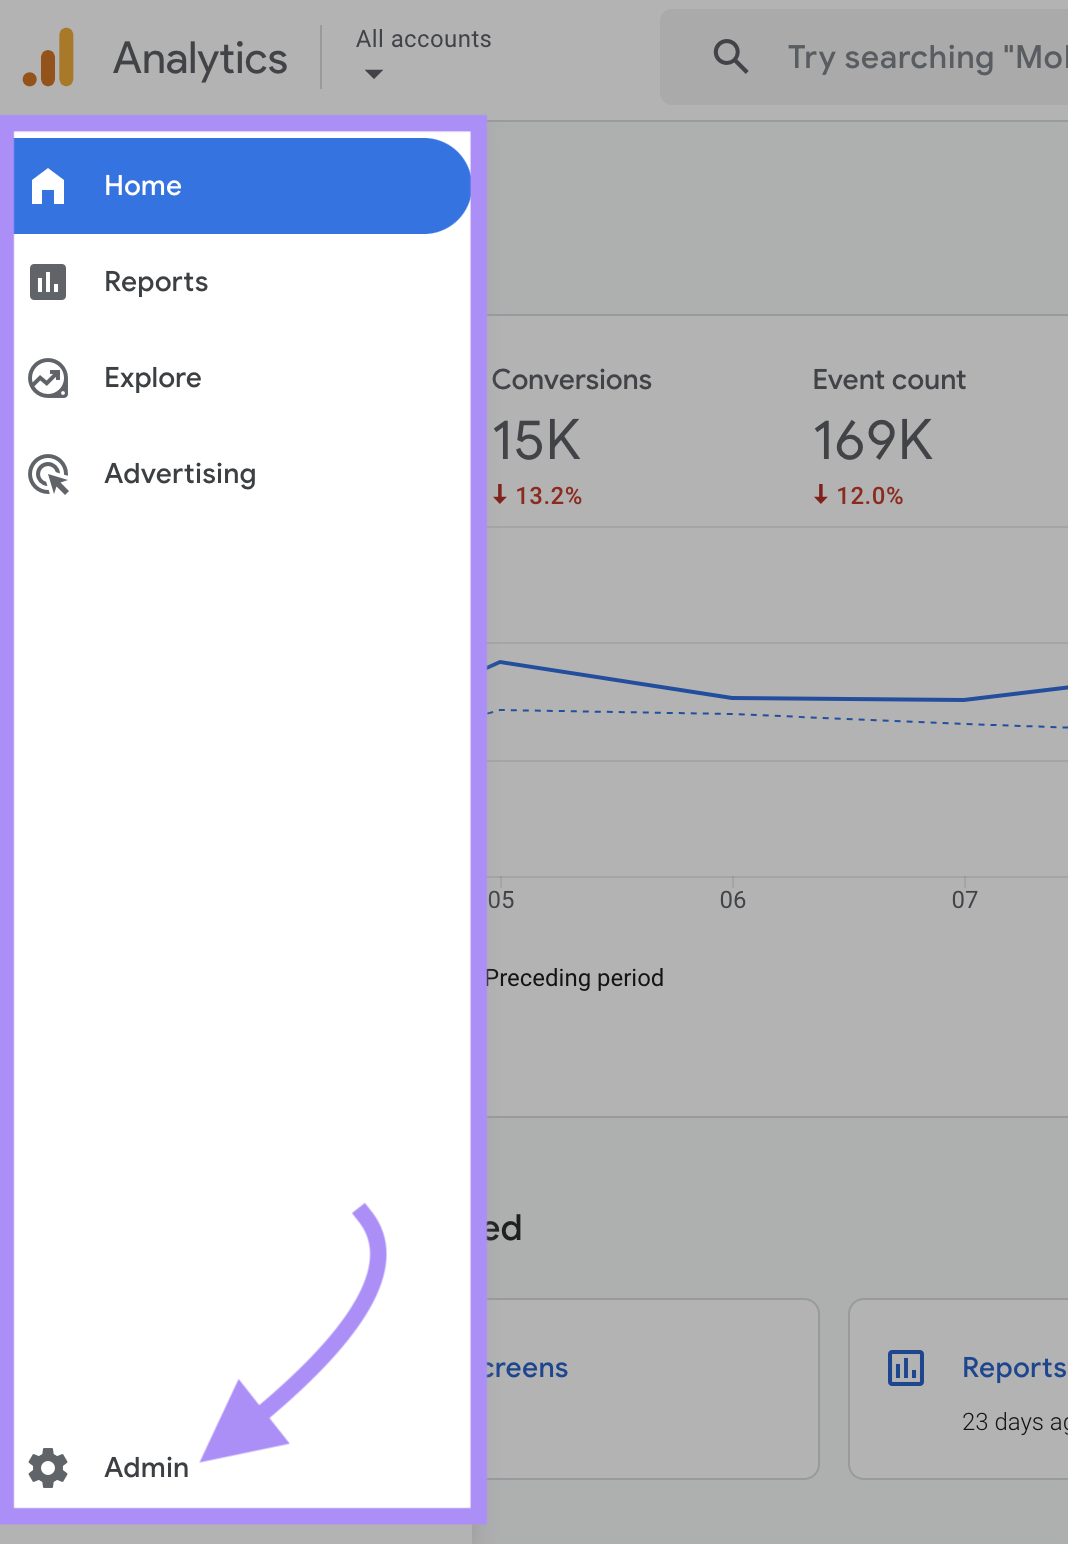
If you’ve used Google Analytics before, go to the homepage, hover over the left side panel, click “Admin,”
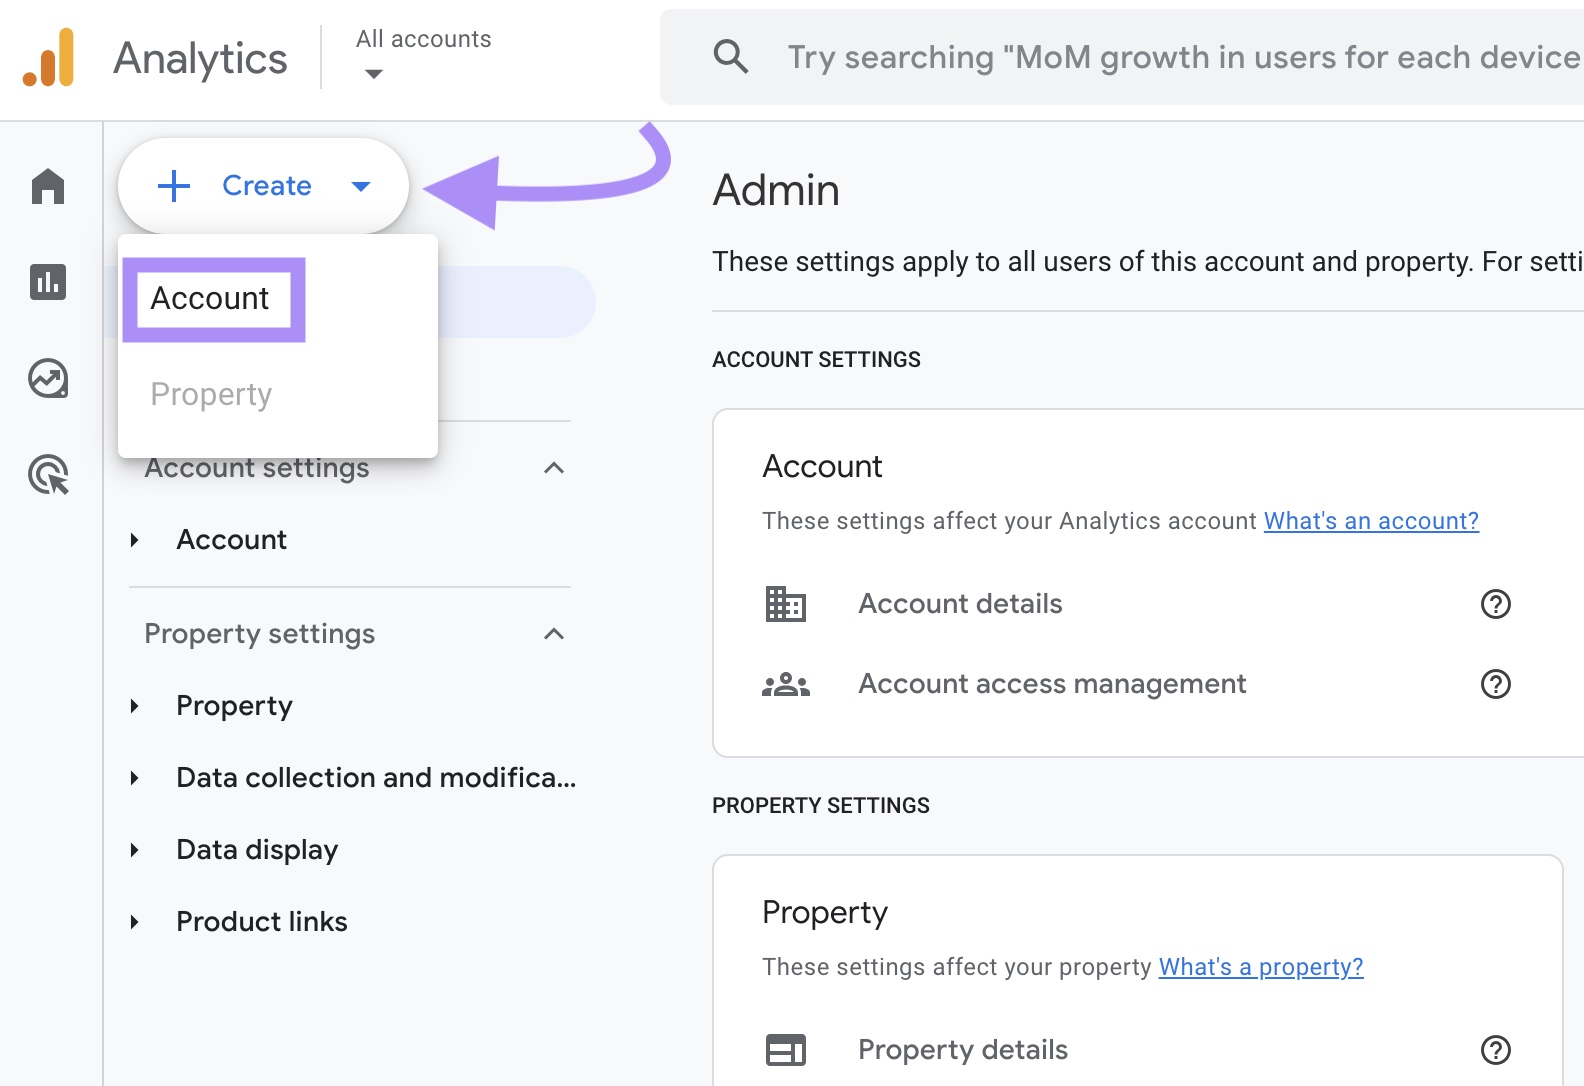
Next, click “Create” and select “Account.”
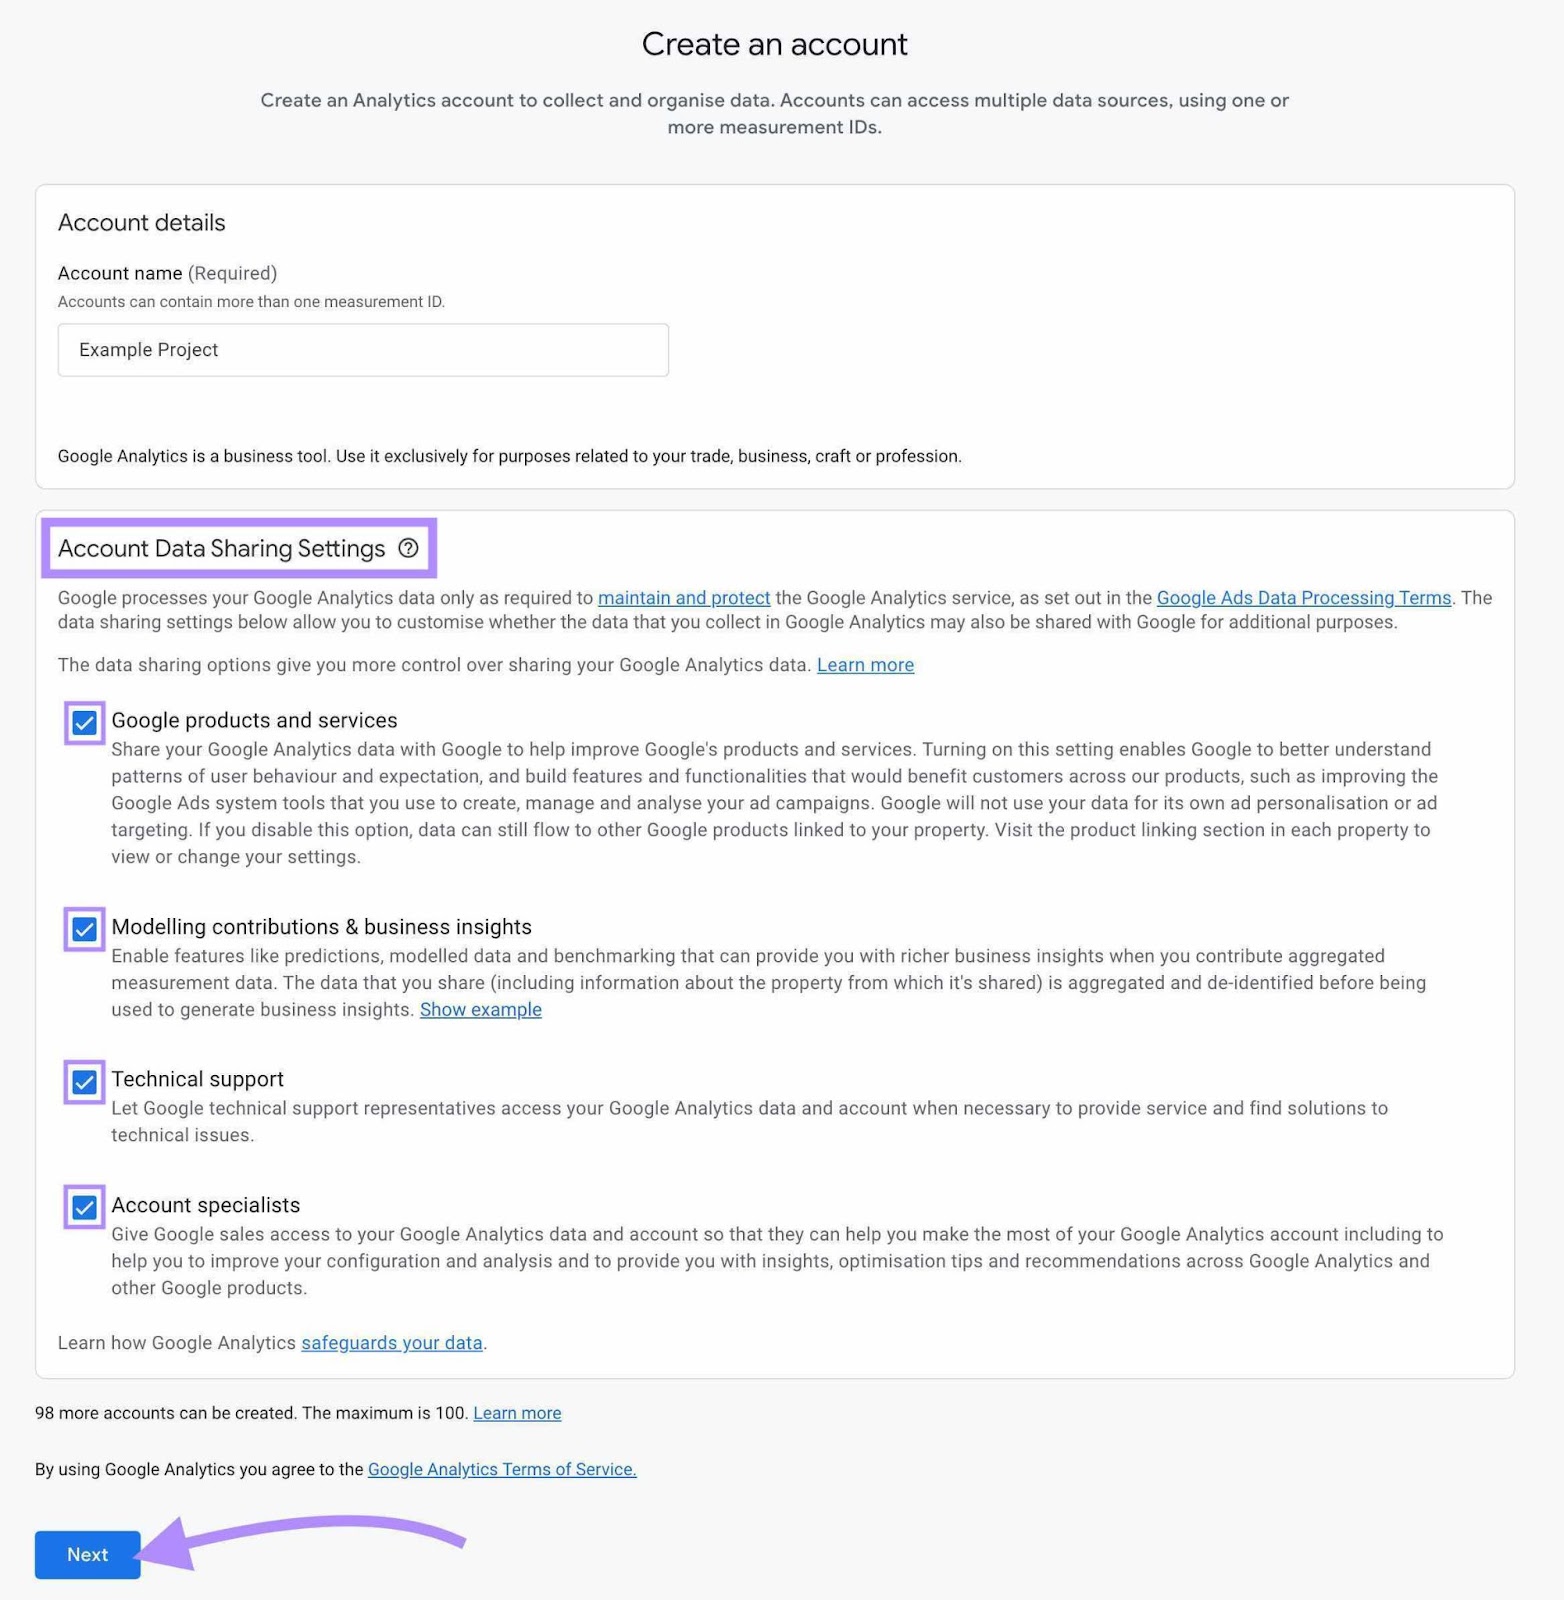
Name Your Account
Enter a name for your account or use your business name (e.g., “Bob’s GA4 Account”).
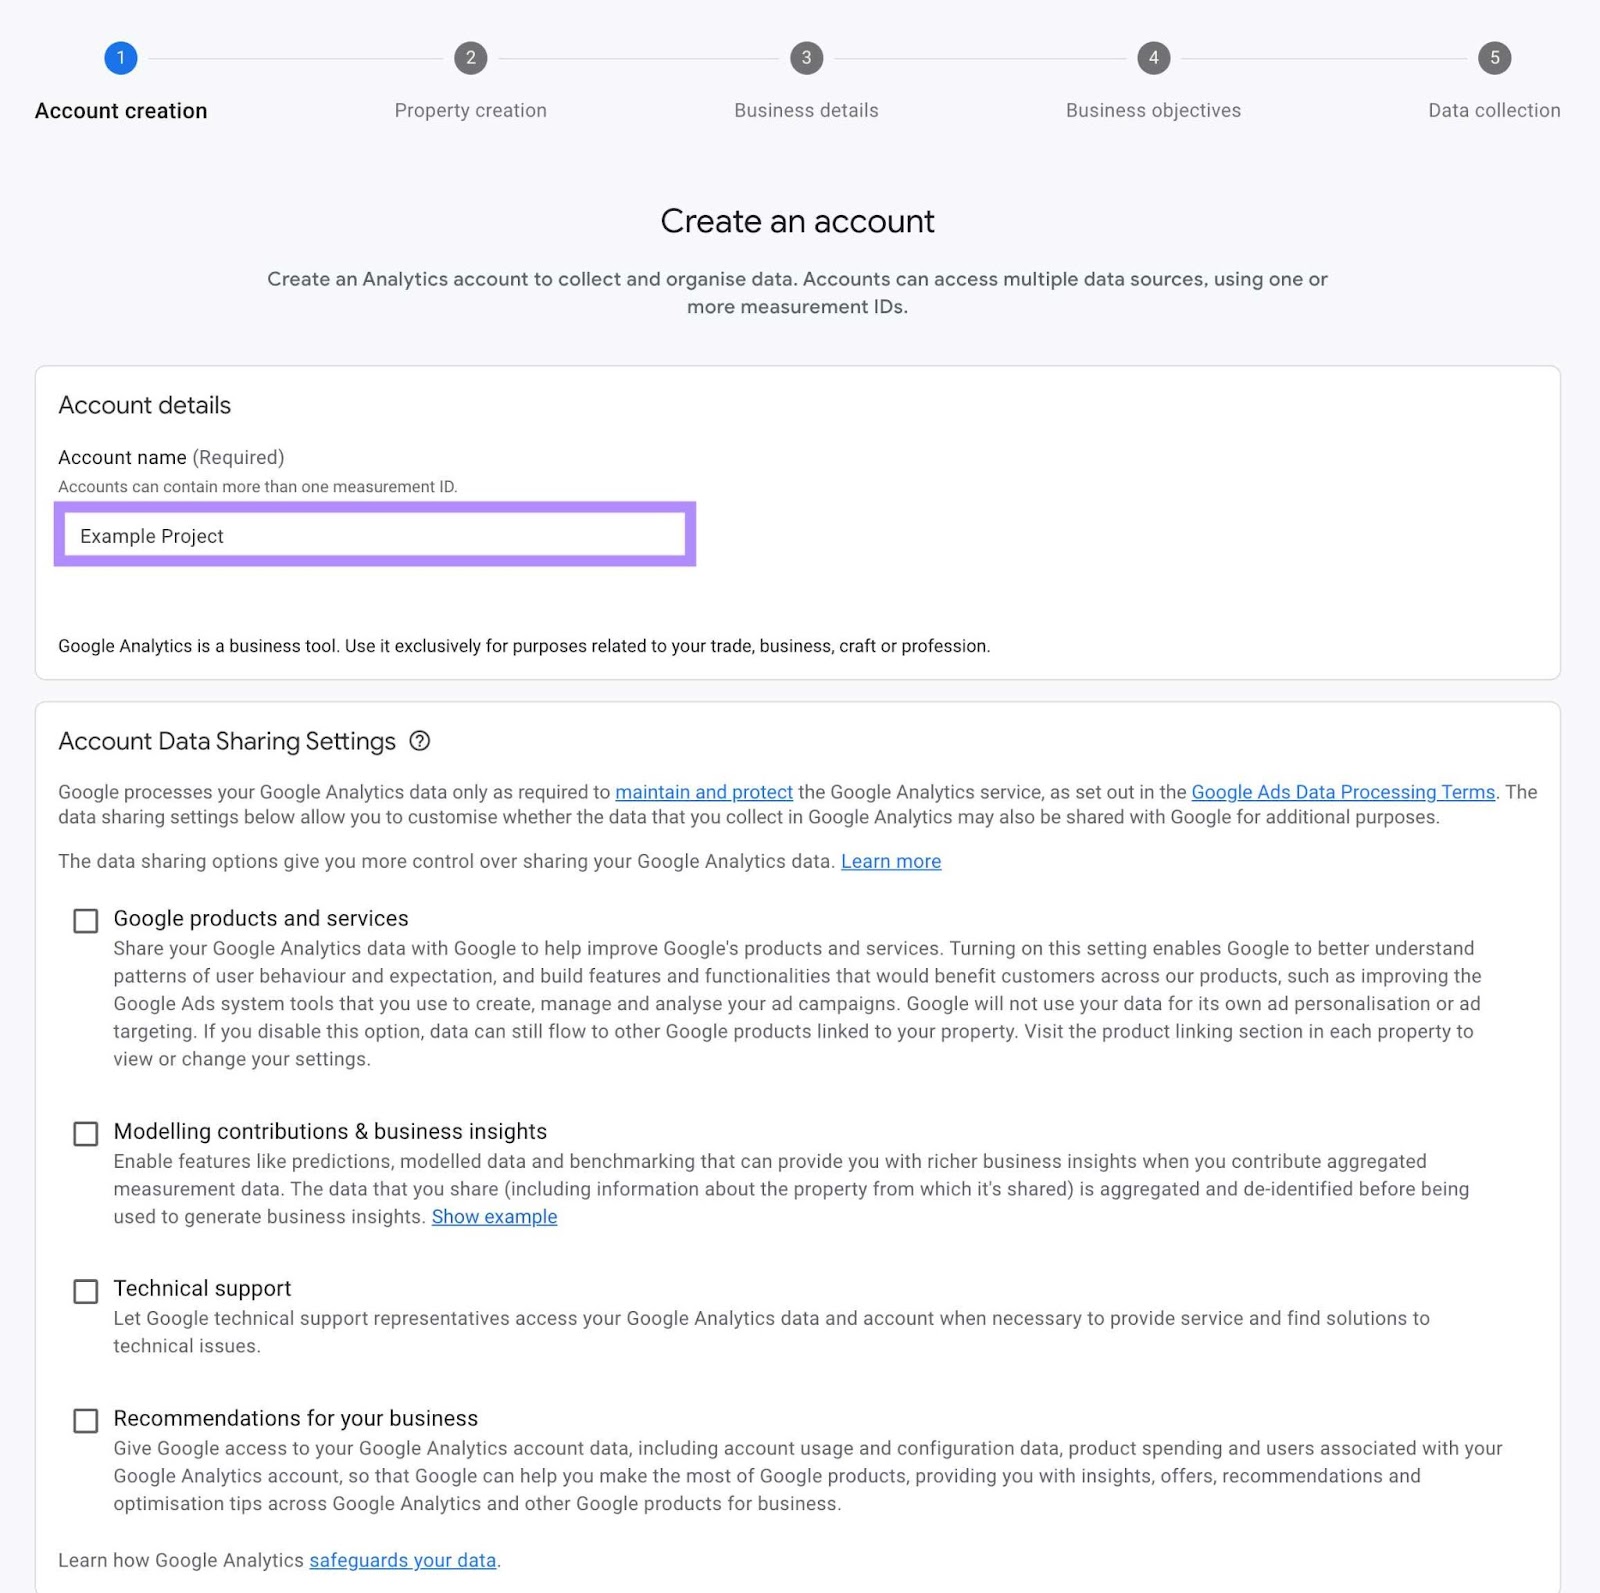
Next, review and choose how much data you want to share with Google by selecting or deselecting the checkboxes.
Then click “Next.”
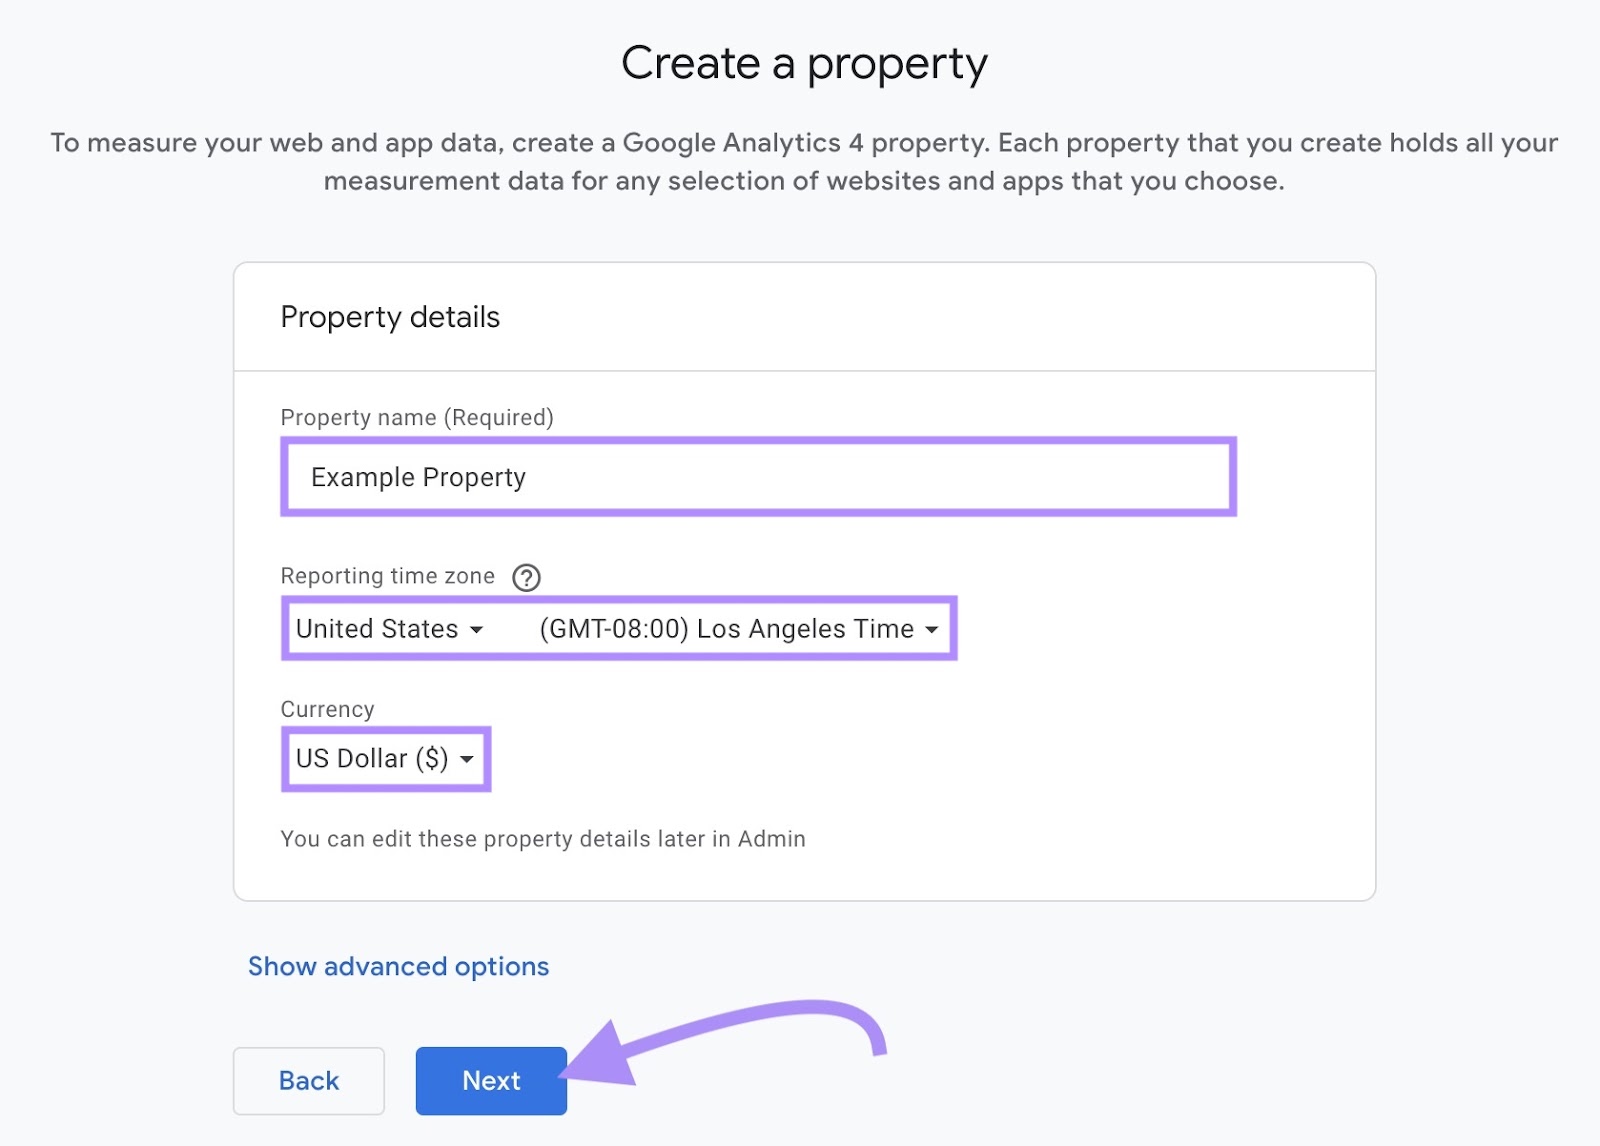
Create a Property
Next, you’ll be asked to create a property. A property can include multiple websites or apps. Name your property (e.g., your business name).
Select your time zone and currency. Click “Next.”
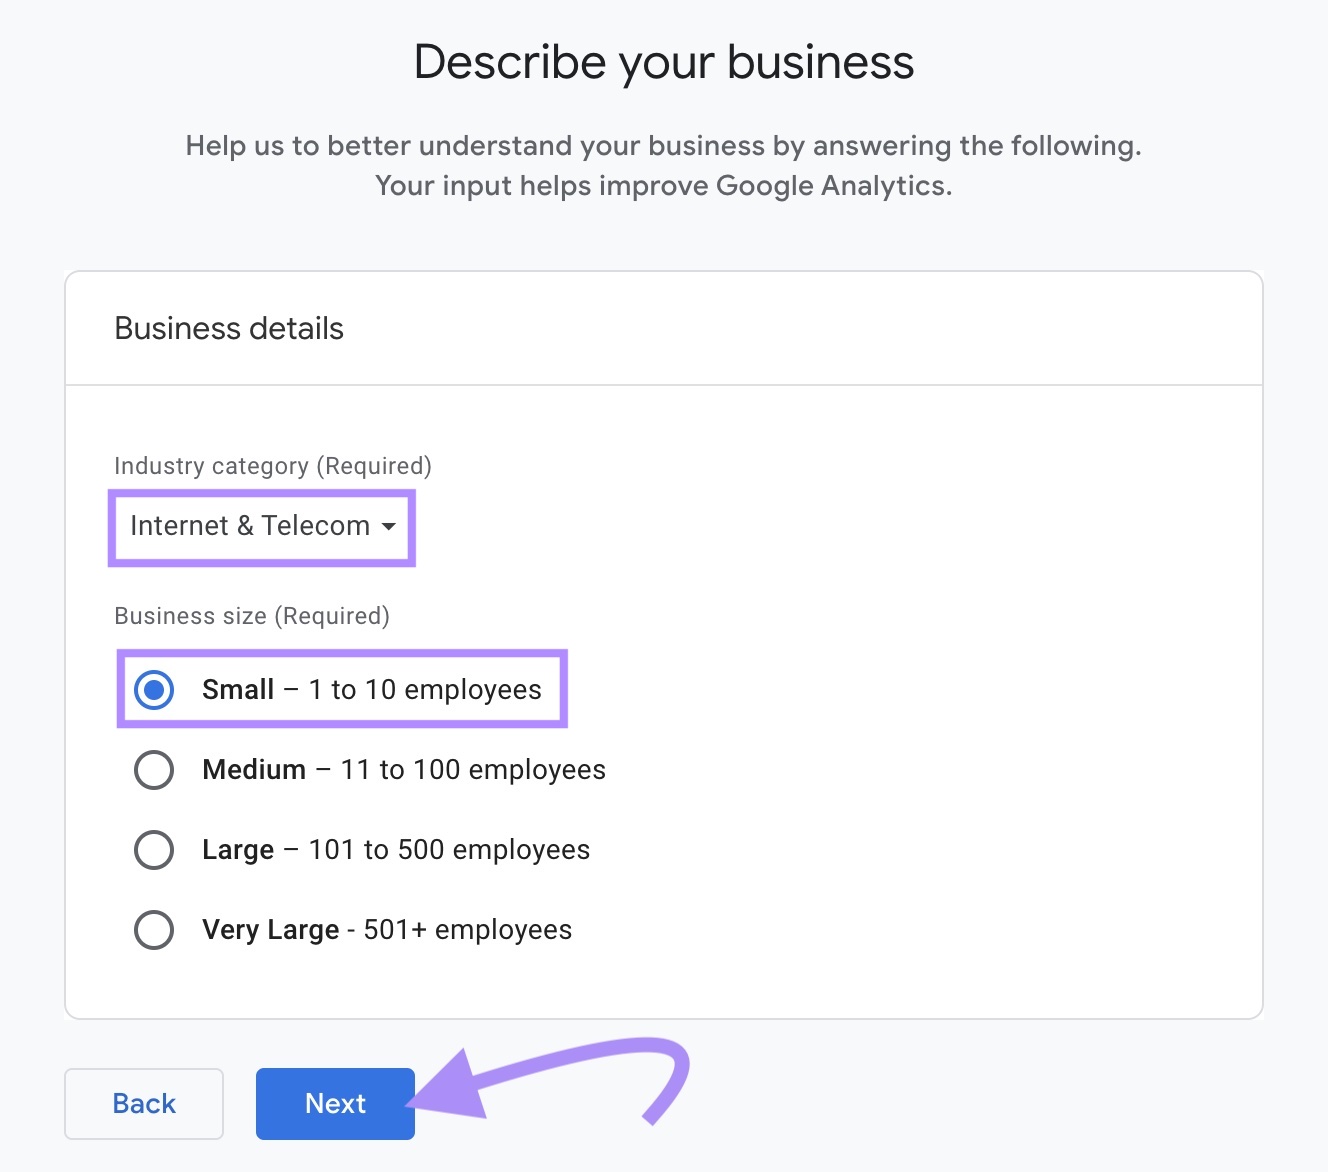
GA will now ask for additional details about your business.
Select your industry category from the drop-down menu. If you can't find your exact industry, choose the closest category.
Select your business size, then click "Next."
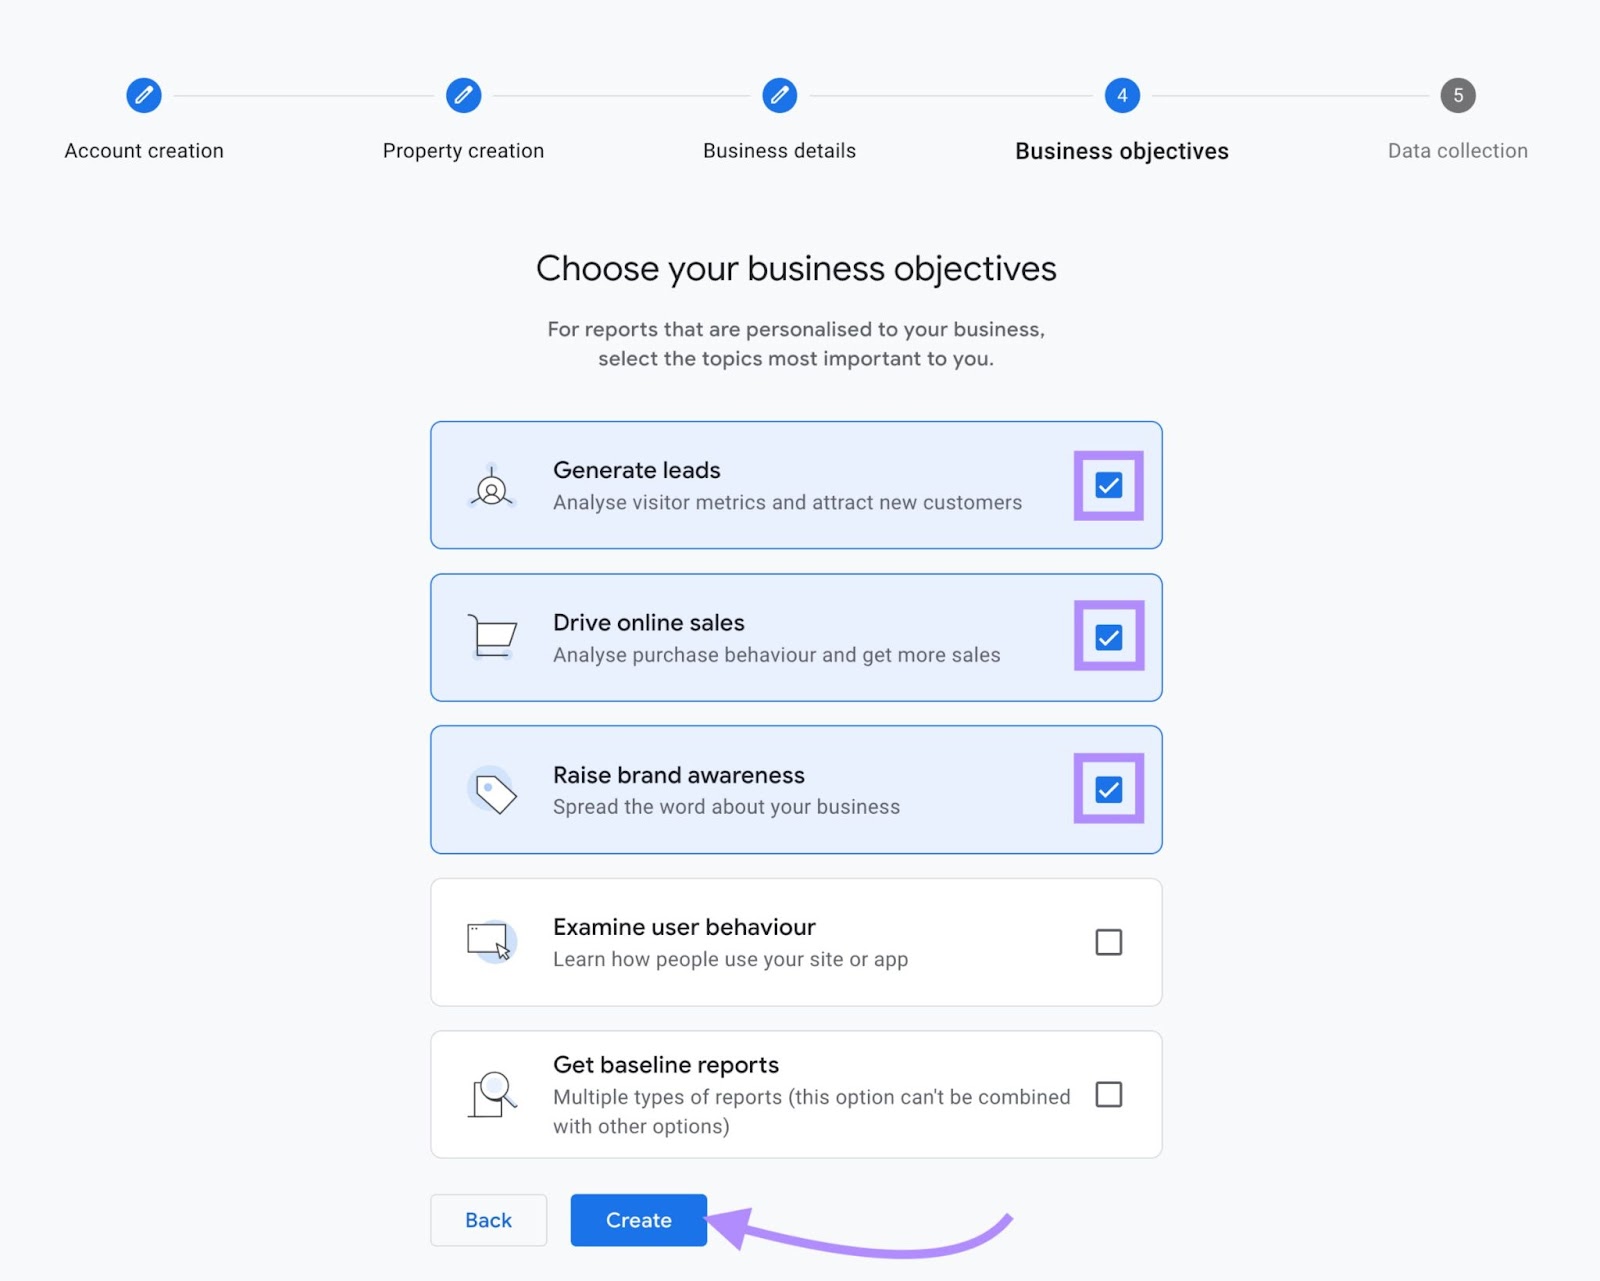
Next, you'll be asked to select the business objectives that best represent your goals. You can choose multiple options, except for the last one.
When you're ready, click "Create."
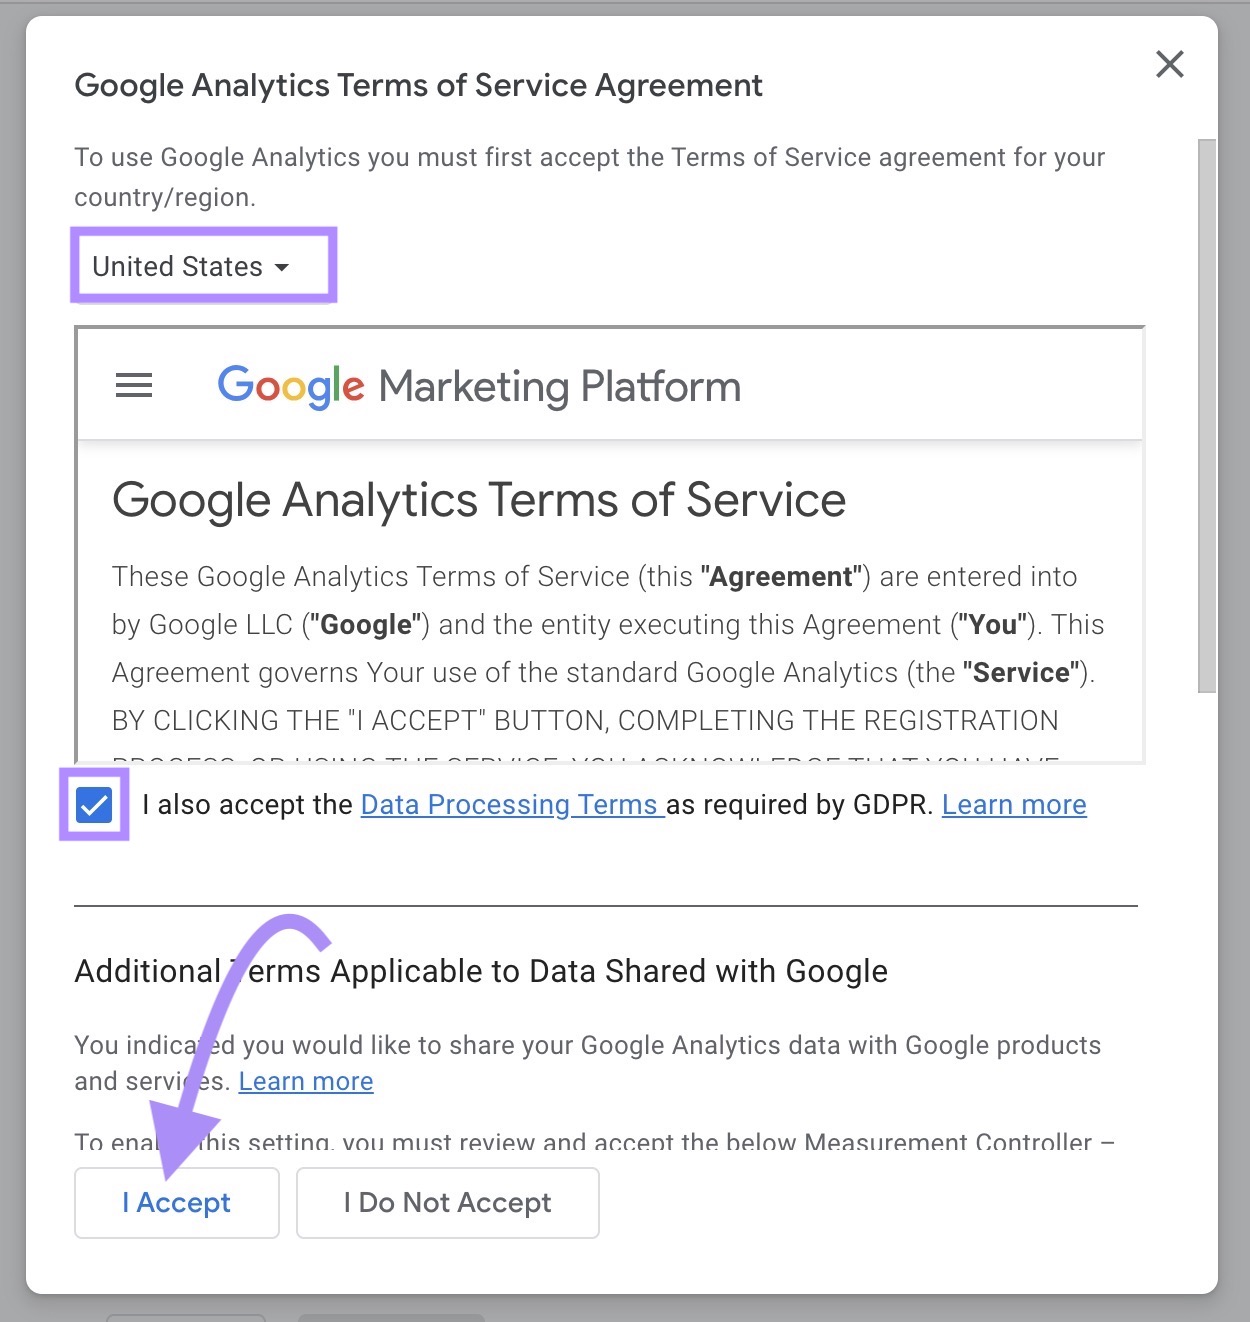
A pop-up with Google Analytics terms of service will appear. Select your country or region from the drop-down menu, accept all terms by checking the boxes, and click "I Accept" after reading the terms and conditions.
Your account and property have now been created!
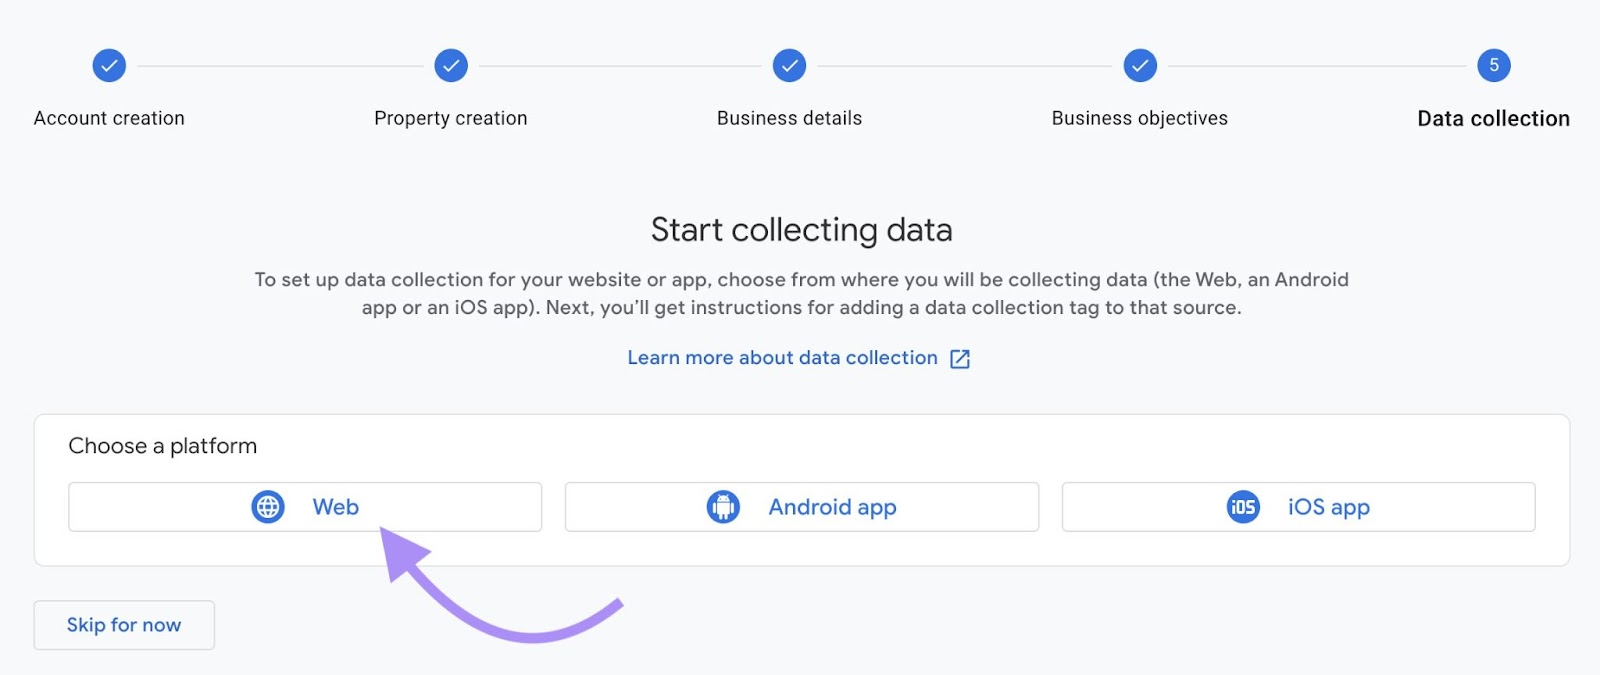
Configuring Your Data Stream
On the next screen, select the relevant platform type for the data you'll be analyzing.
For a WordPress site, select "Web."
If you have multiple websites or apps, you can add them to your property later.
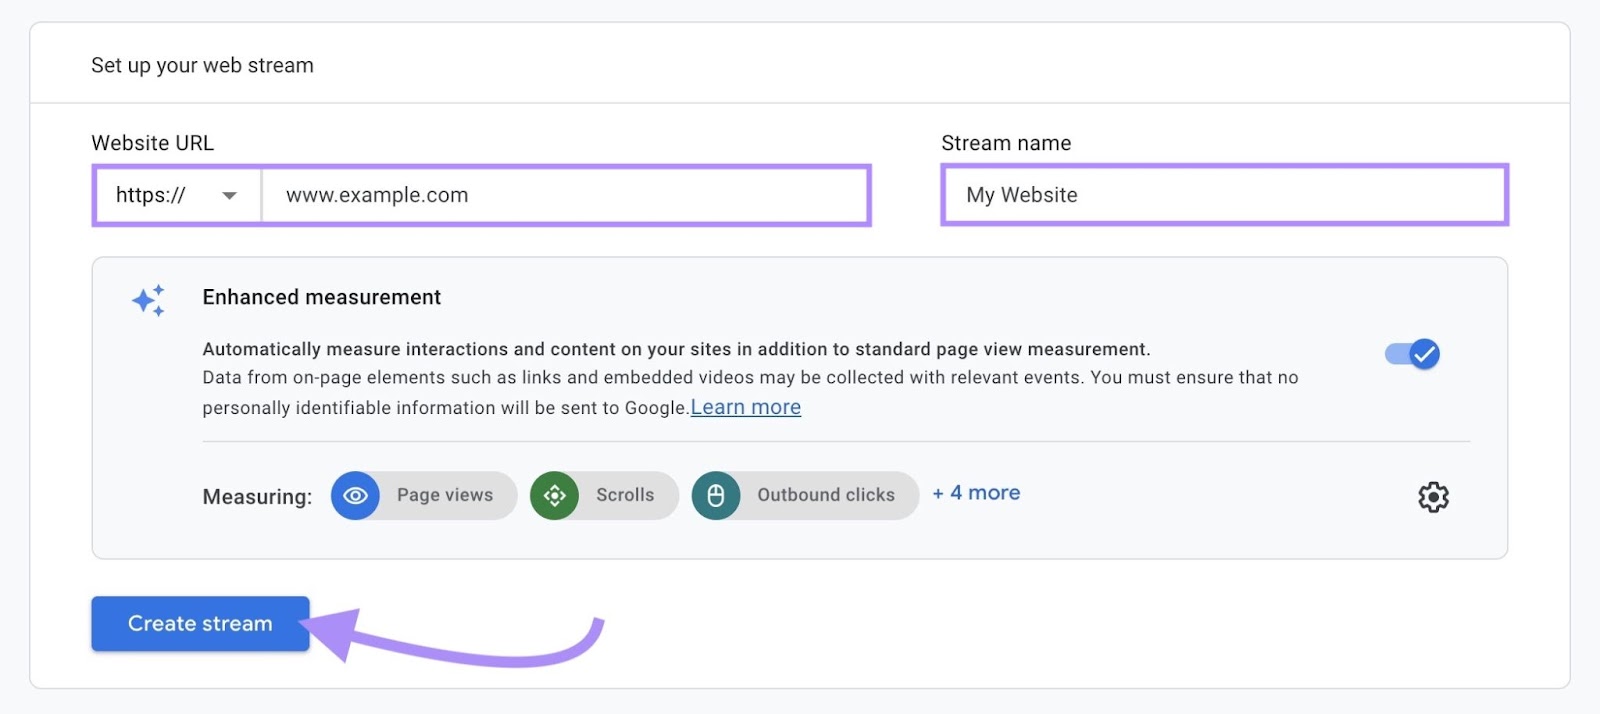
Next, you'll set up your data stream, which means your website.
Note that "https://" is selected by default. If your site doesn't have a valid SSL certificate, select "http://" from the drop-down.
Enter your website's domain and name your data stream. The stream name can be your domain name without ".com" or something like "Business Name Website."
If you have multiple websites or apps under the same property, make sure your stream names are distinct.
"Enhanced measurement" is enabled by default. You can toggle it off if you prefer not to enable additional user interaction tracking.
When you're ready, click "Create stream."
Finding Your Google Analytics 4 Measurement ID
The next step is to get the unique measurement ID provided by Google Analytics to integrate into your website and start collecting data.
Your "Measurement ID" (or Google Tag) is a code that identifies your website or other data source.
After creating your data stream, you'll land on the "Web stream details" page.
You'll see an alert at the top indicating that data collection isn't active yet. This is because you haven't installed the Google tag on your WordPress site.
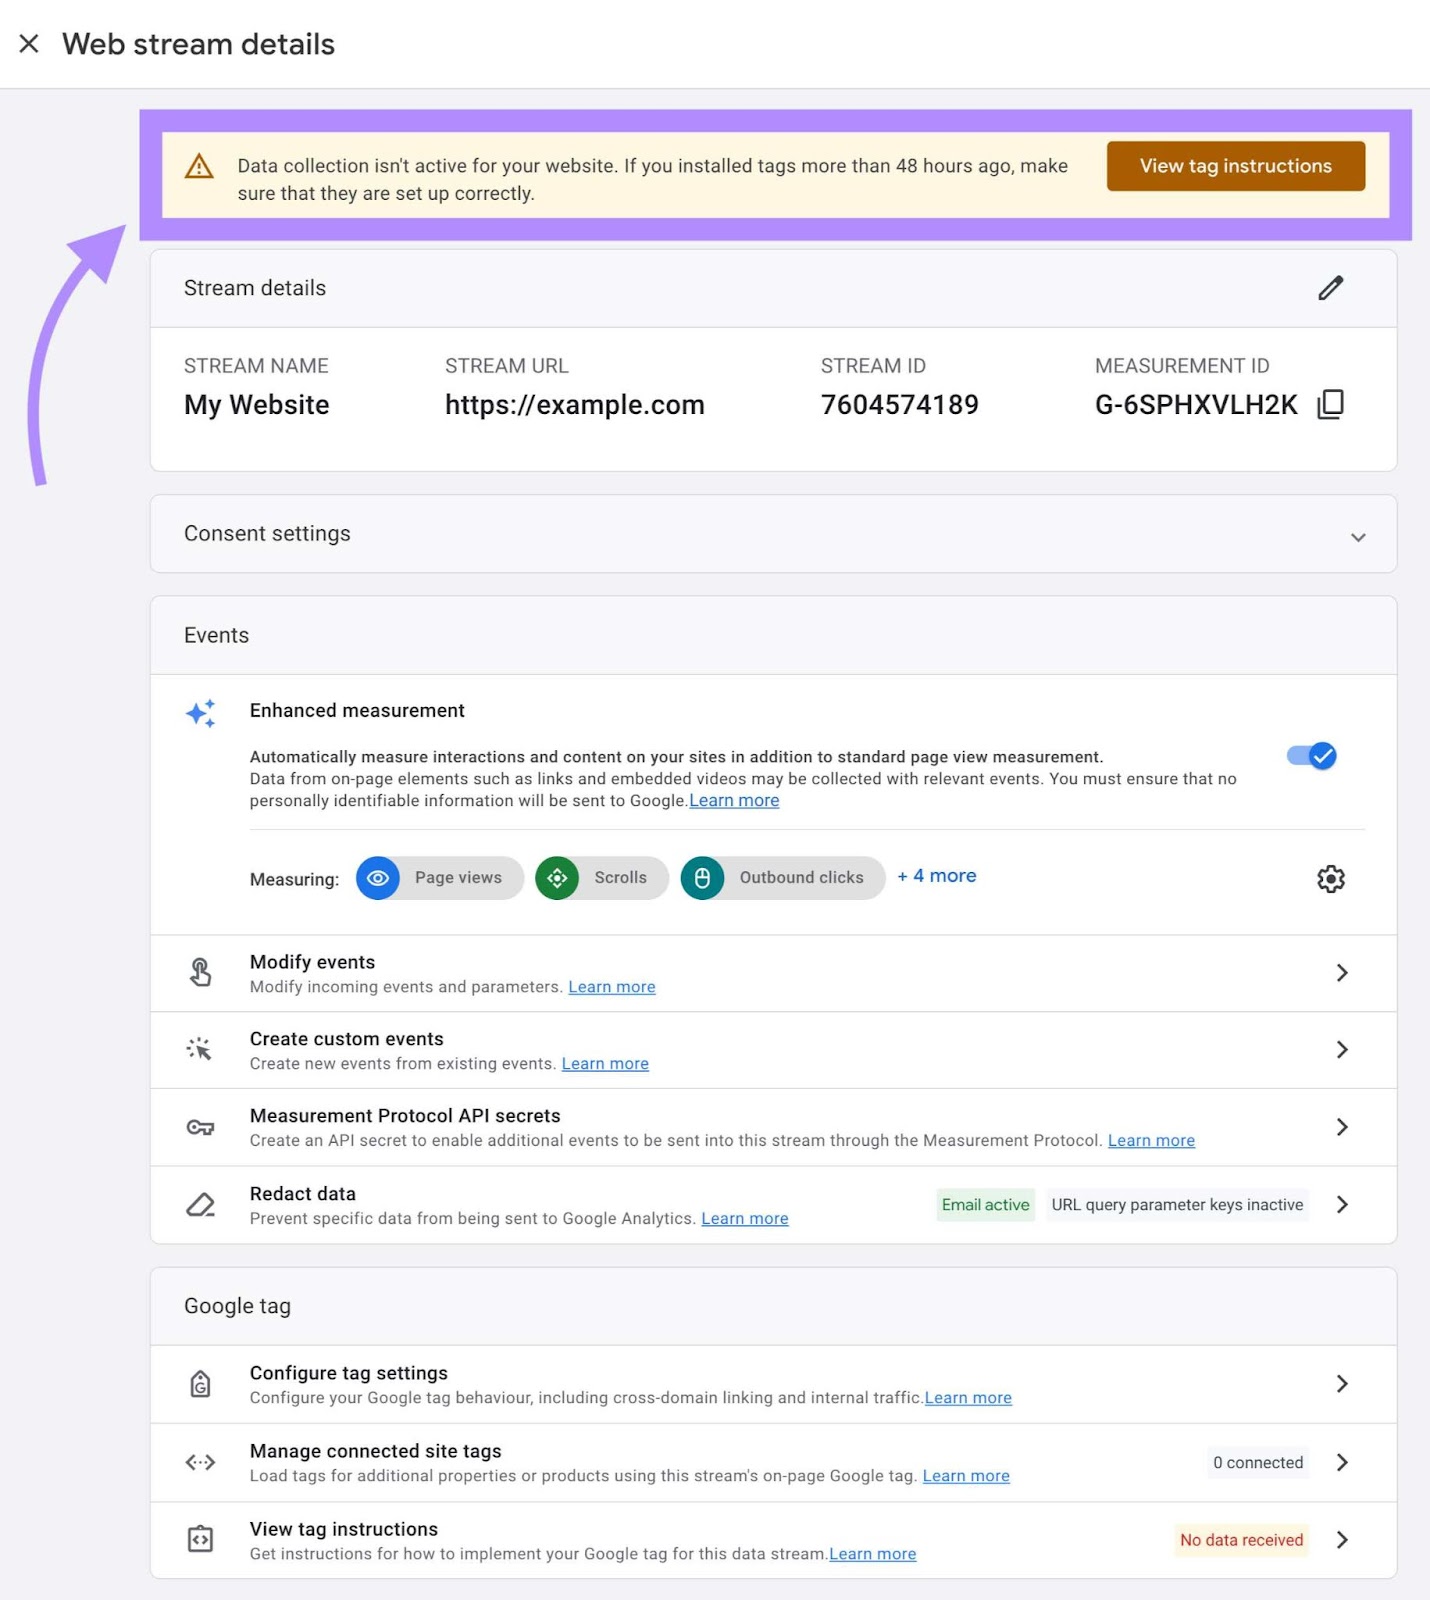
So, let’s do that.
Copy your “Measurement ID” to your clipboard.

Now that you have your Google Analytics tracking code, let's add it to your WordPress site.
-
Step 2: Install Google Analytics 4 in WordPress
There are a few different ways to add Google Analytics to WordPress.
Let’s start with the simplest way.
-
Option 1: Paste Your Measurement ID in WordPress’s Integrations Tool
WordPress requires you to have the Explorer plan or higher to paste your measurement ID directly into the tool.
If you have a lower WordPress plan, you’ll need to add your measurement ID manually, which we'll discuss later.
Start by opening your site's WordPress dashboard.
In the navigation menu on the left, click on "Tools" and select "Marketing" to open the "Marketing and Integrations" menu.
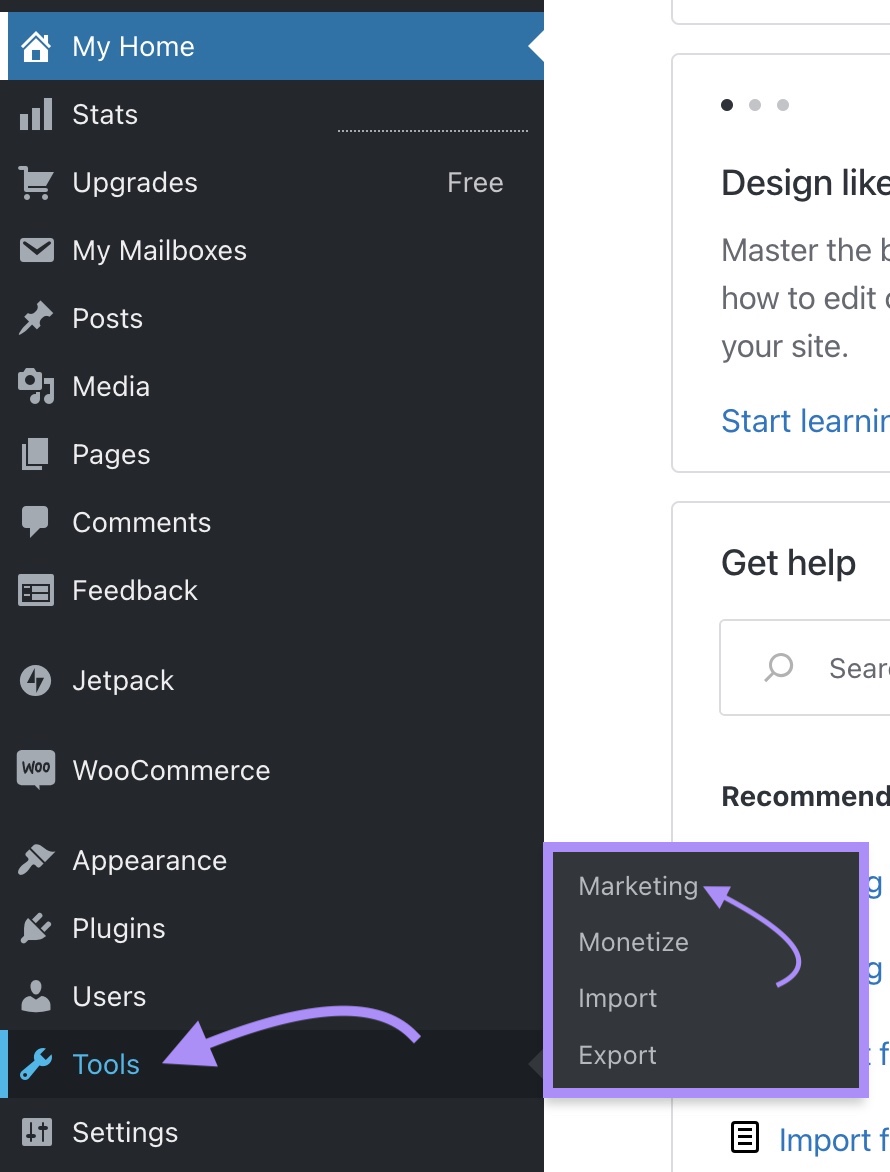
Select the “Traffic” tab.

Next, scroll down until you see the Google Analytics section. Find the field labeled "Google Analytics Measurement ID."
Paste the code you copied into this field and click the "Save settings" button.
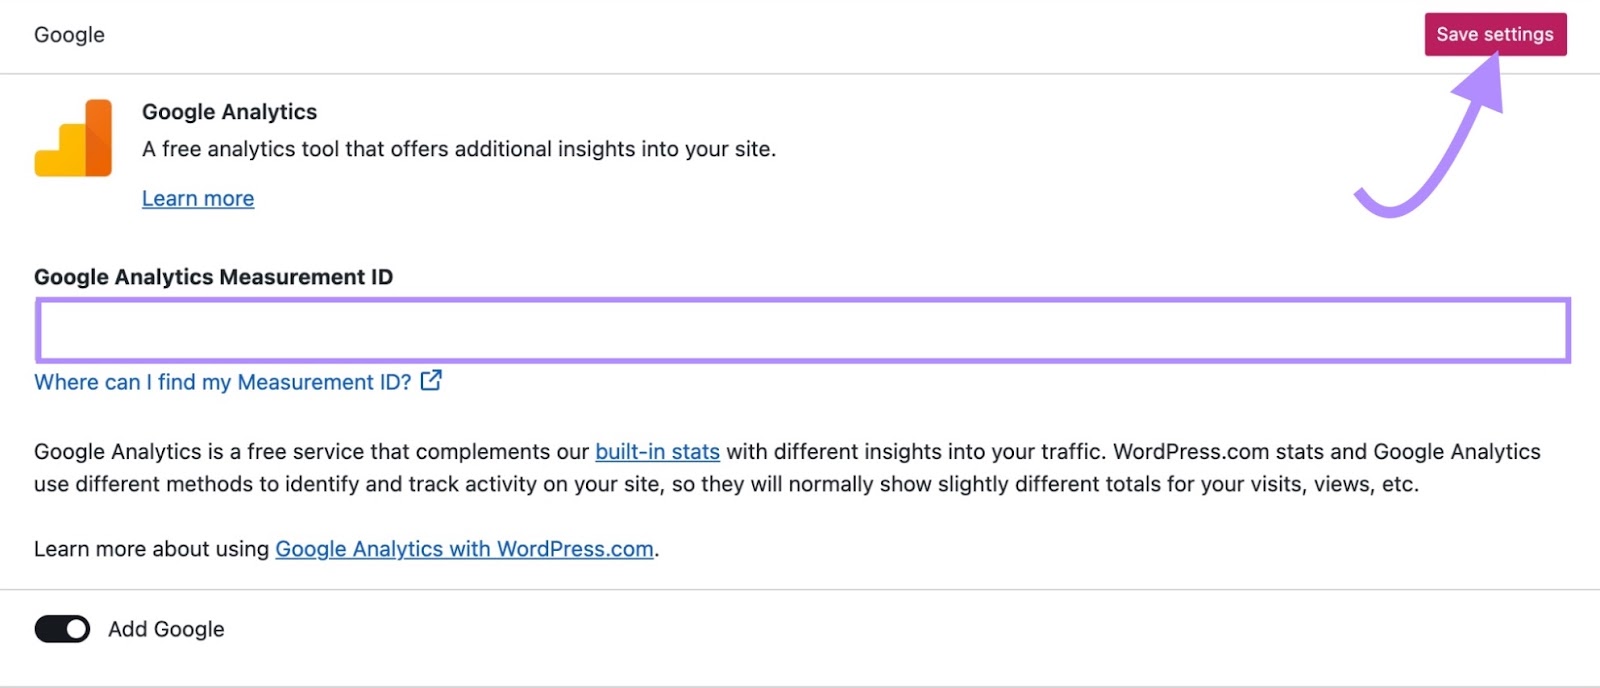
Voilà! It's that simple. It may take a few minutes and sometimes it may take up to 48 hours to establish an active connection and start gathering data.
-
Option 2: Install Google Analytics Using a Plugin
If your website supports plugins (Creator plan and up), follow Google's instructions to configure GA4 using a WordPress plugin.
From the "Web Stream details" page, click "View tag instructions" to open the installation instructions menu.
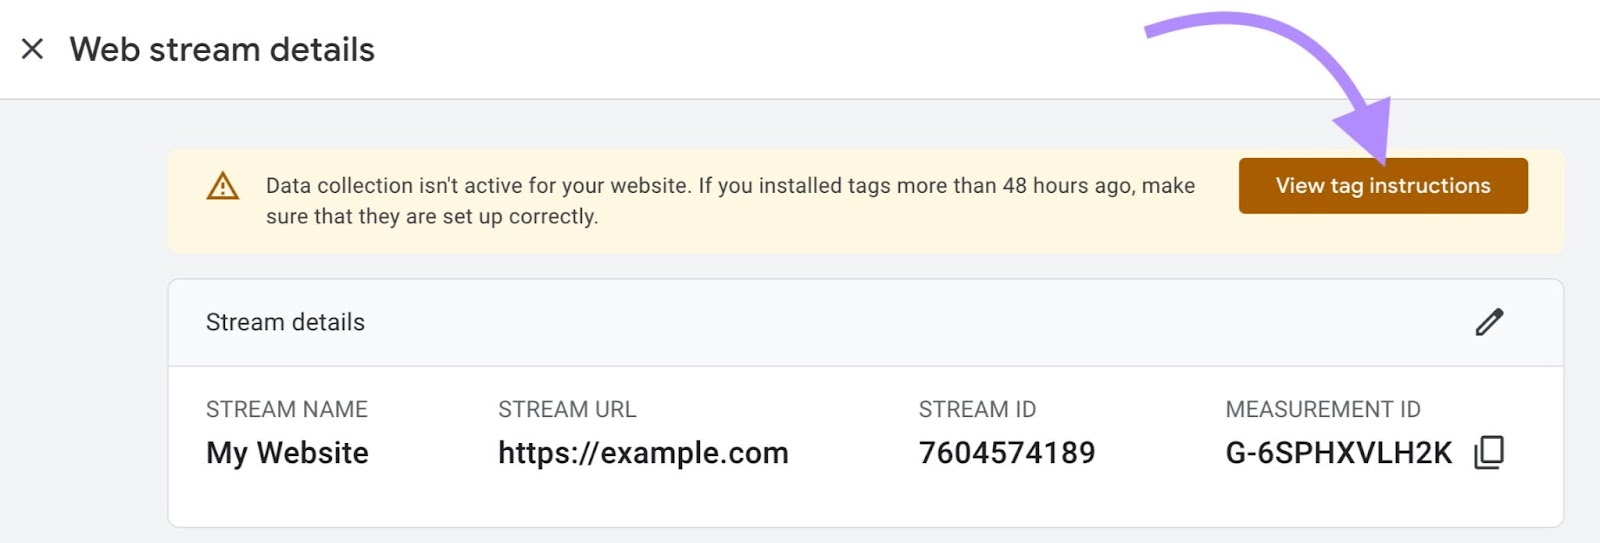
On this page, you'll see two options: "Install with a website builder or CMS" or "Install manually." Click "Install with a website builder or CMS." Then, click "Select your platform."
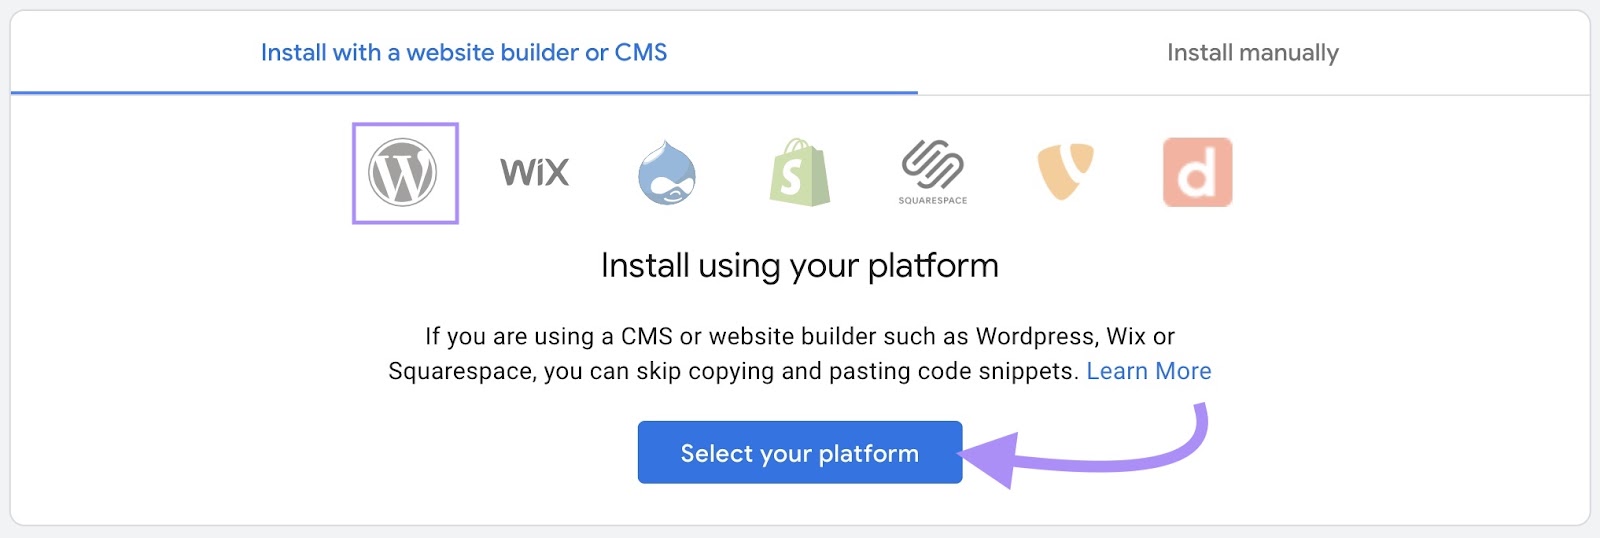
A drop-down menu will open. Notice the WordPress logo next to some options? That means we can take a shortcut.
Site Kit is the official WordPress Google Analytics plugin from Google. It allows you to see your traffic analytics data directly in your WordPress dashboard.
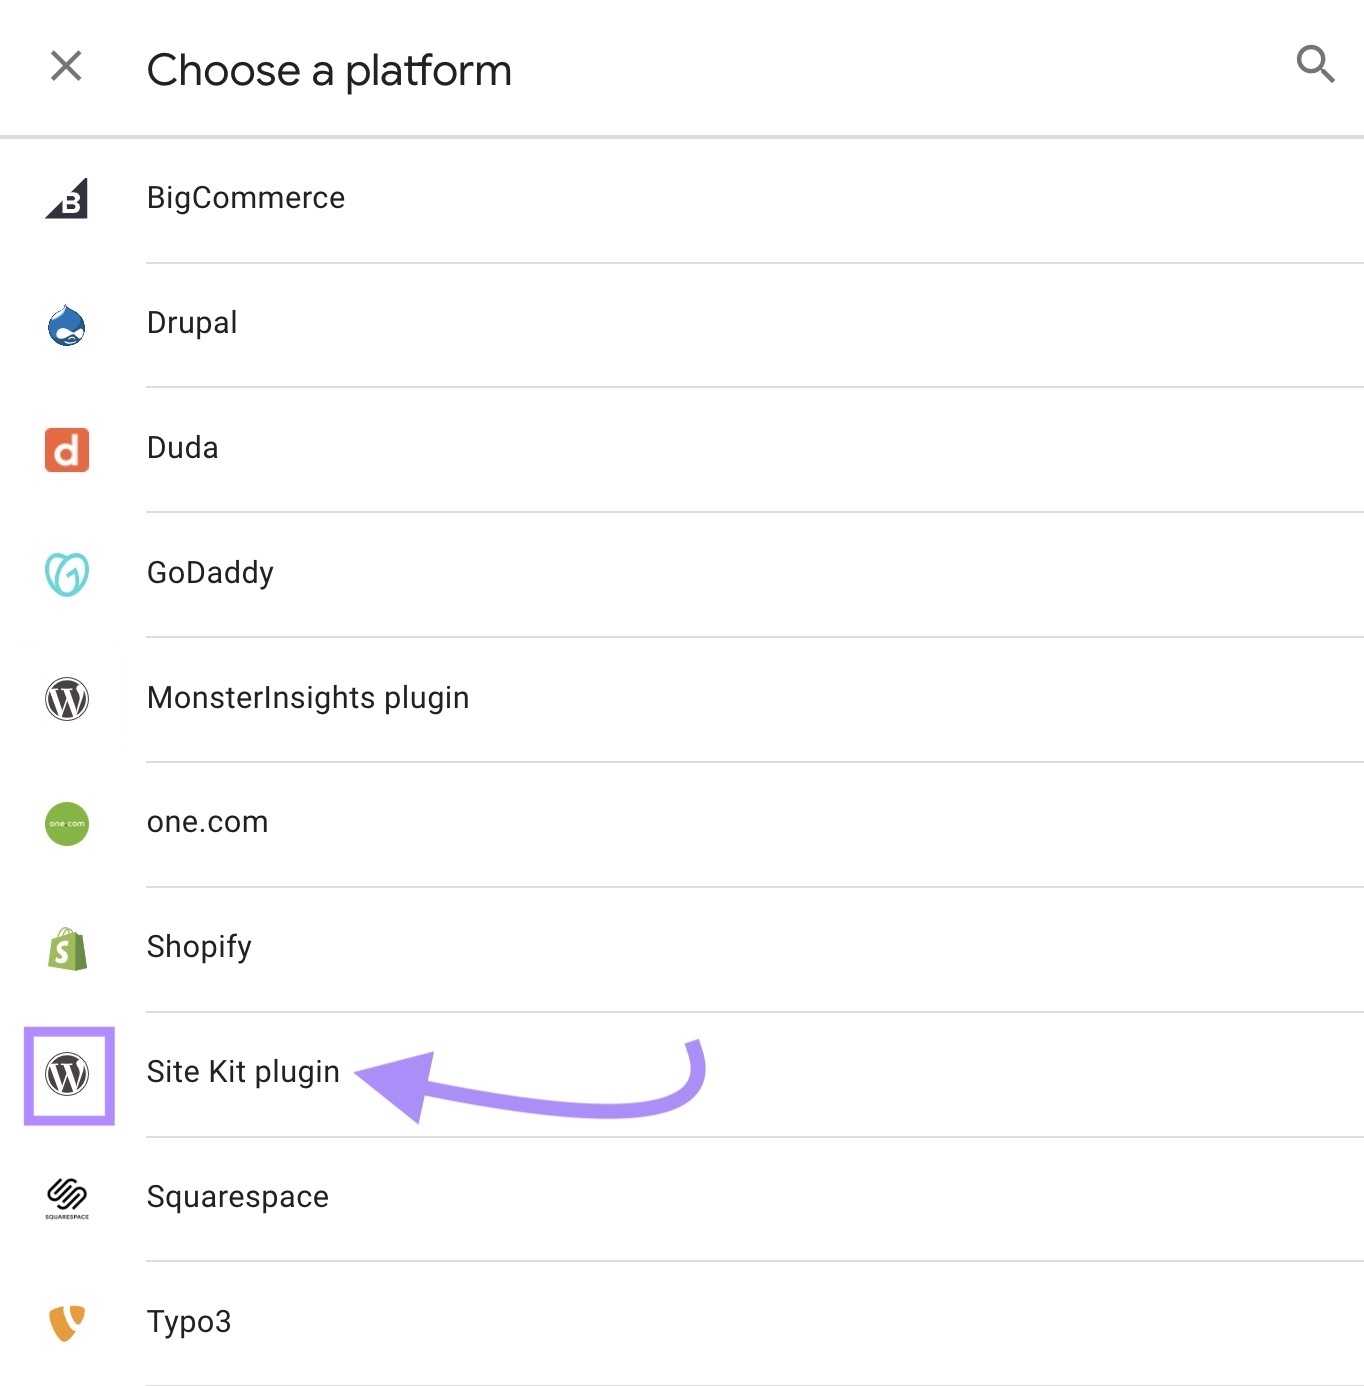
Select "Site Kit Plugin" from the drop-down menu.
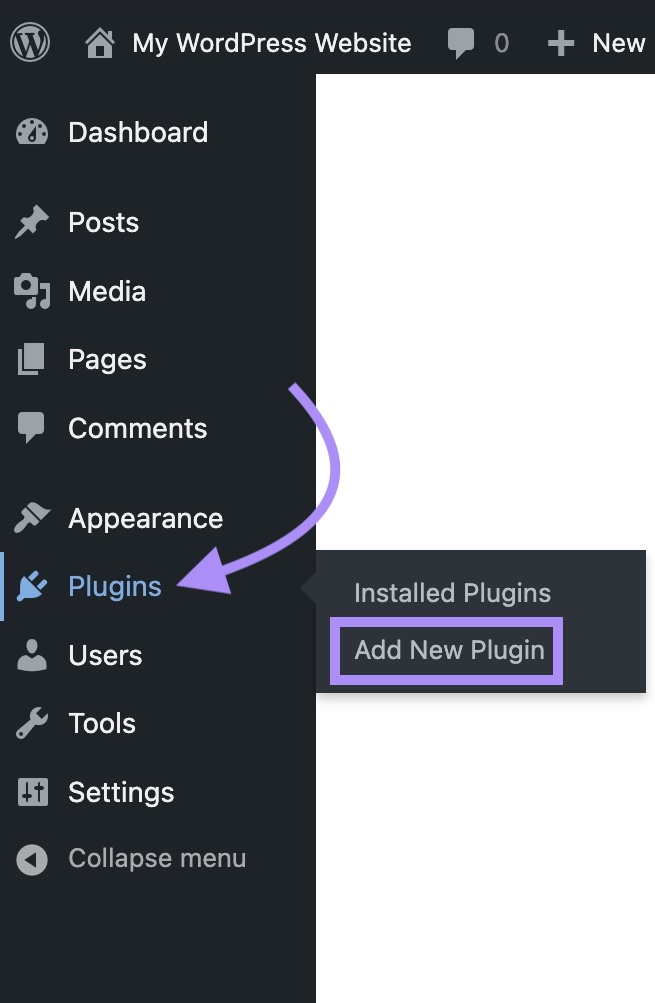
Next, log in to WordPress, navigate to “Plugins” using the left-hand menu, and click “Add New Plugin.”
Note: You need at least a Creator WordPress plan to install plugins on your site.
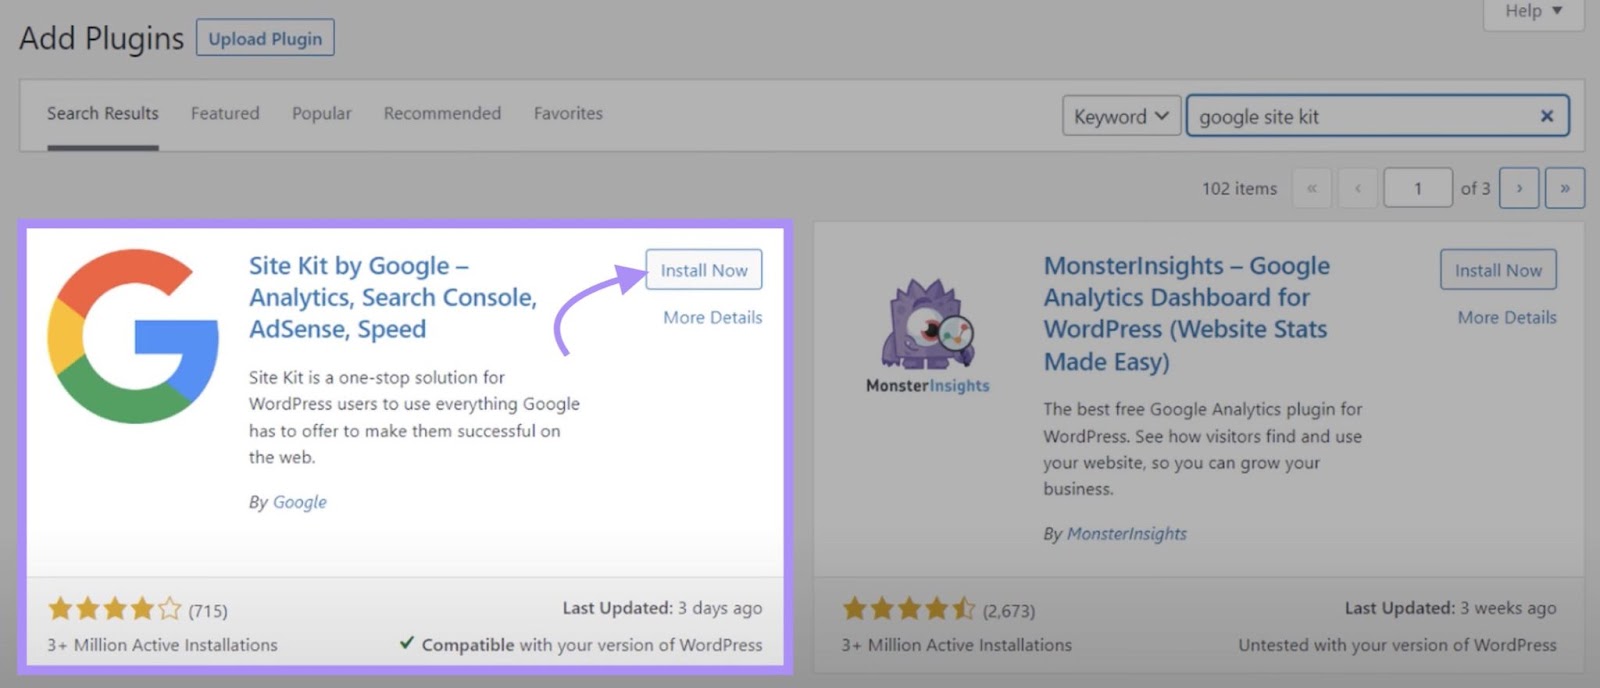
Then, search for “Site Kit.”
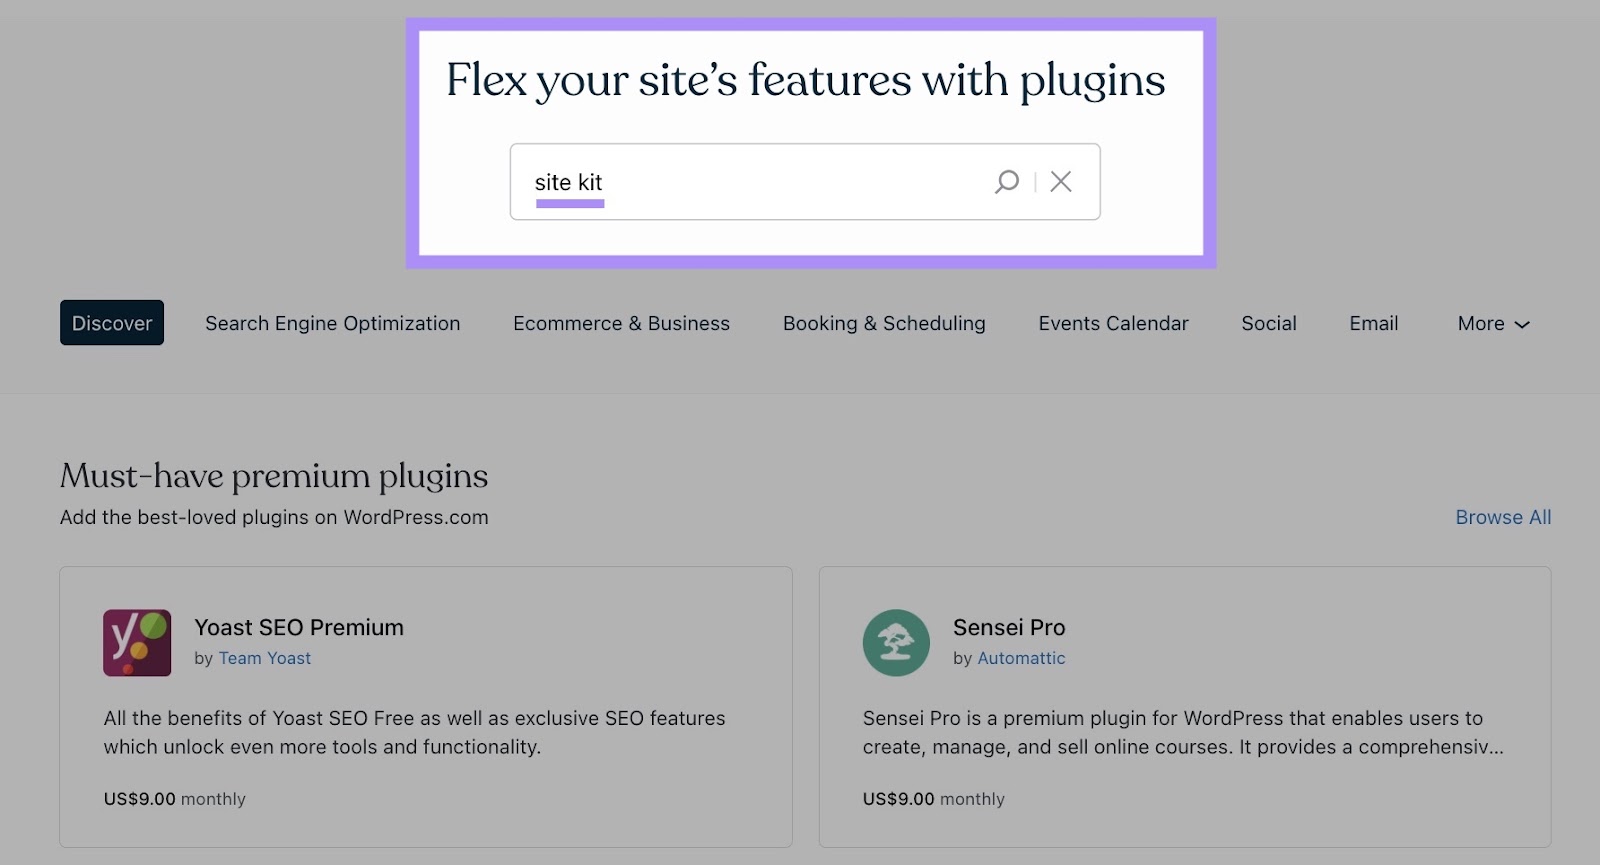
Click “Install Now.”
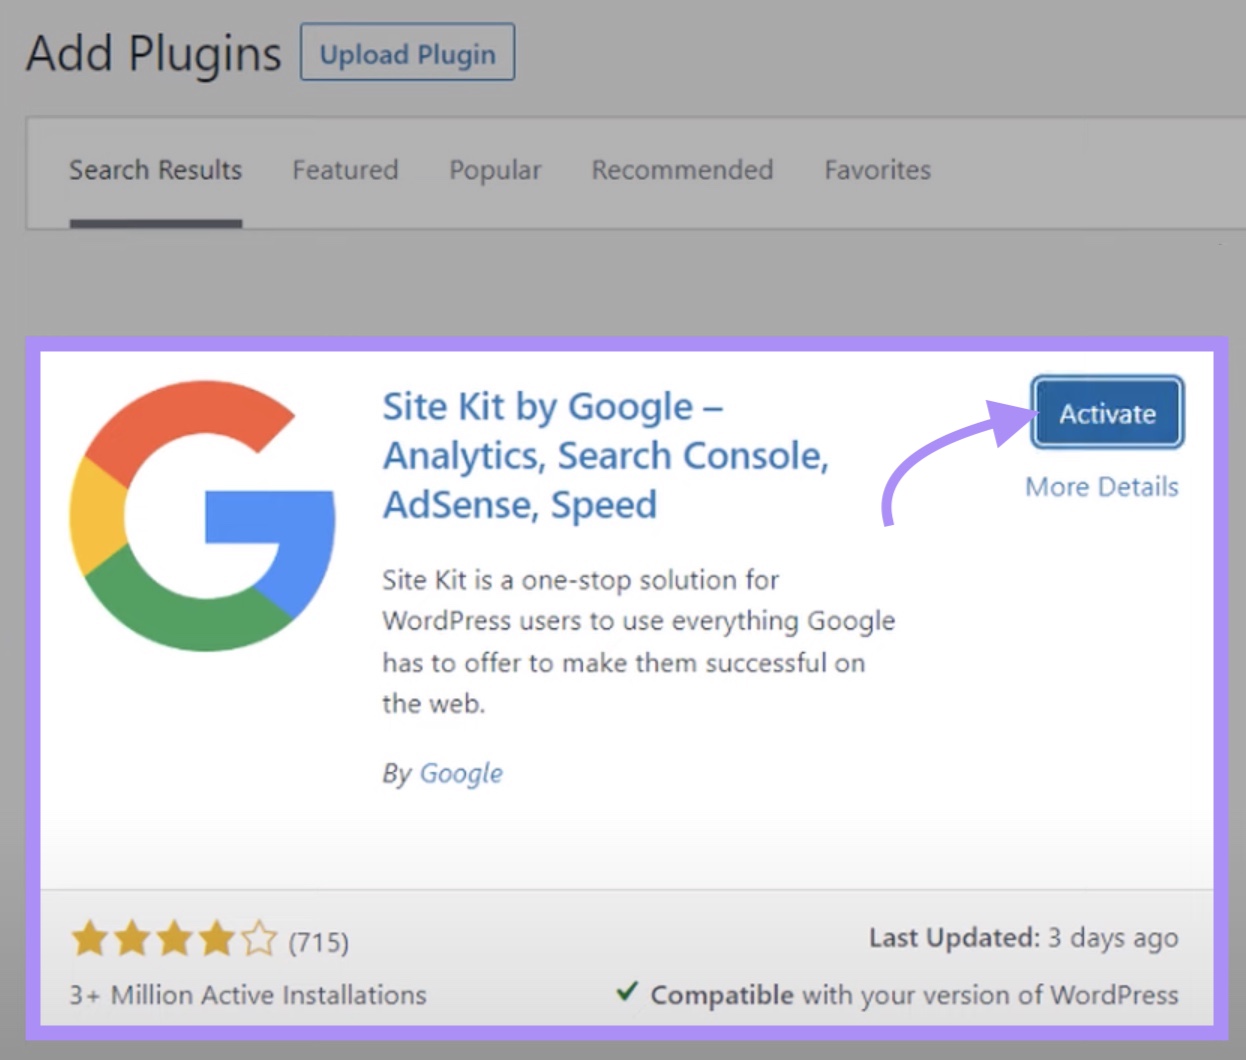
Once installed, open the Site Kit plugin from the Plugins menu and click “Activate.”
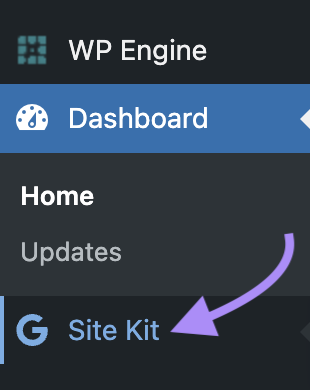
The plugin will now appear in your main menu. Click on “Site Kit” to open it.
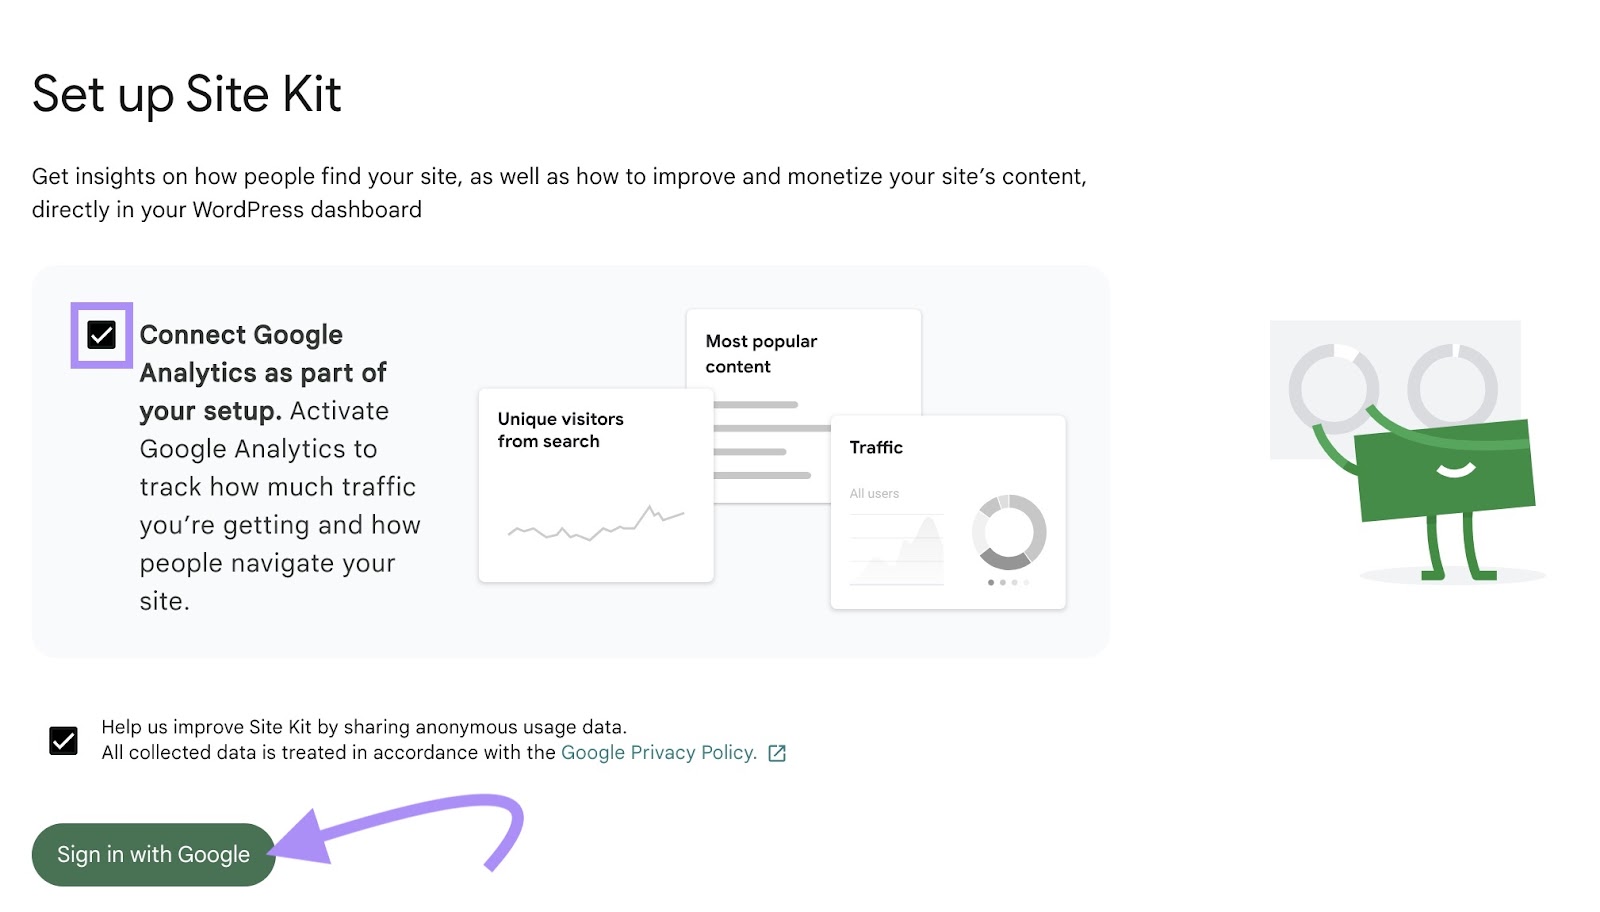
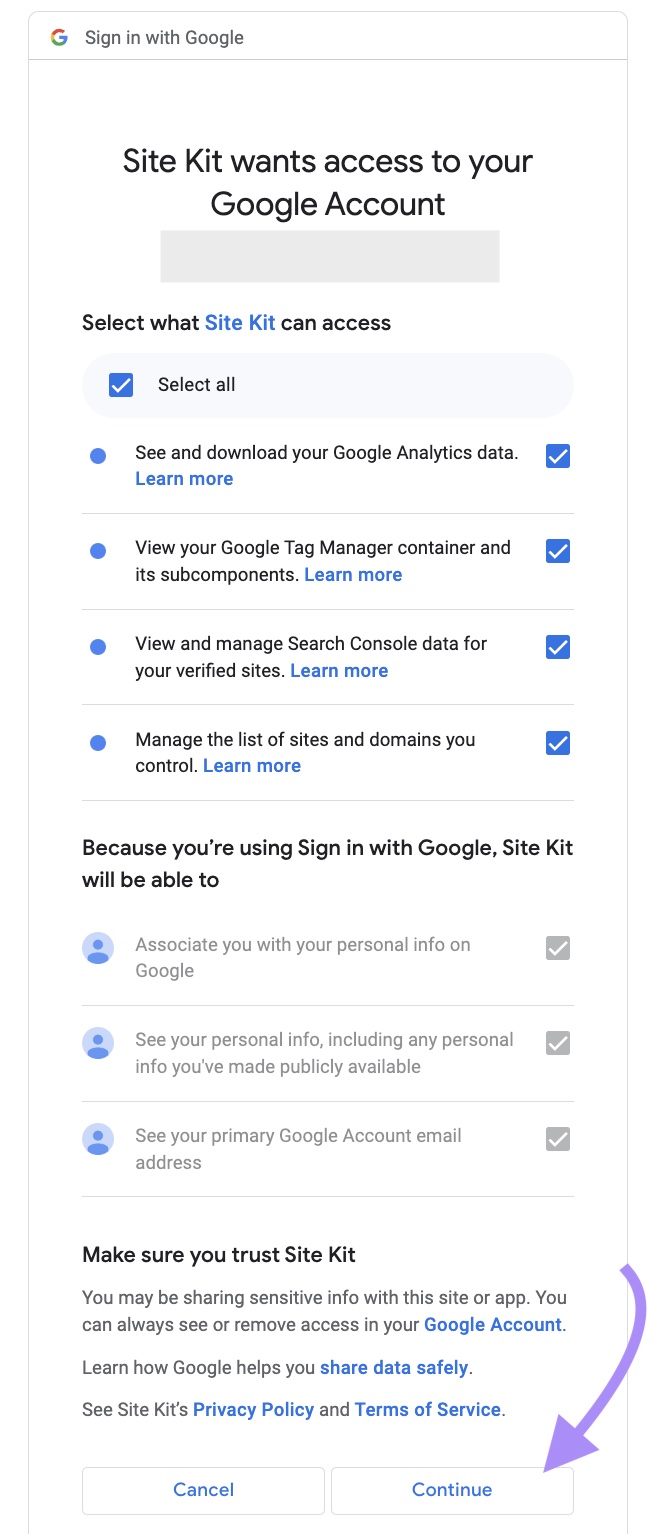
On the setup page, check the box next to "Connect Google Analytics as part of your setup" and sign in using the same Google credentials you used to create your Google Analytics account.
Next, choose what data Site Kit can access. Choose all that apply and click “Continue.”
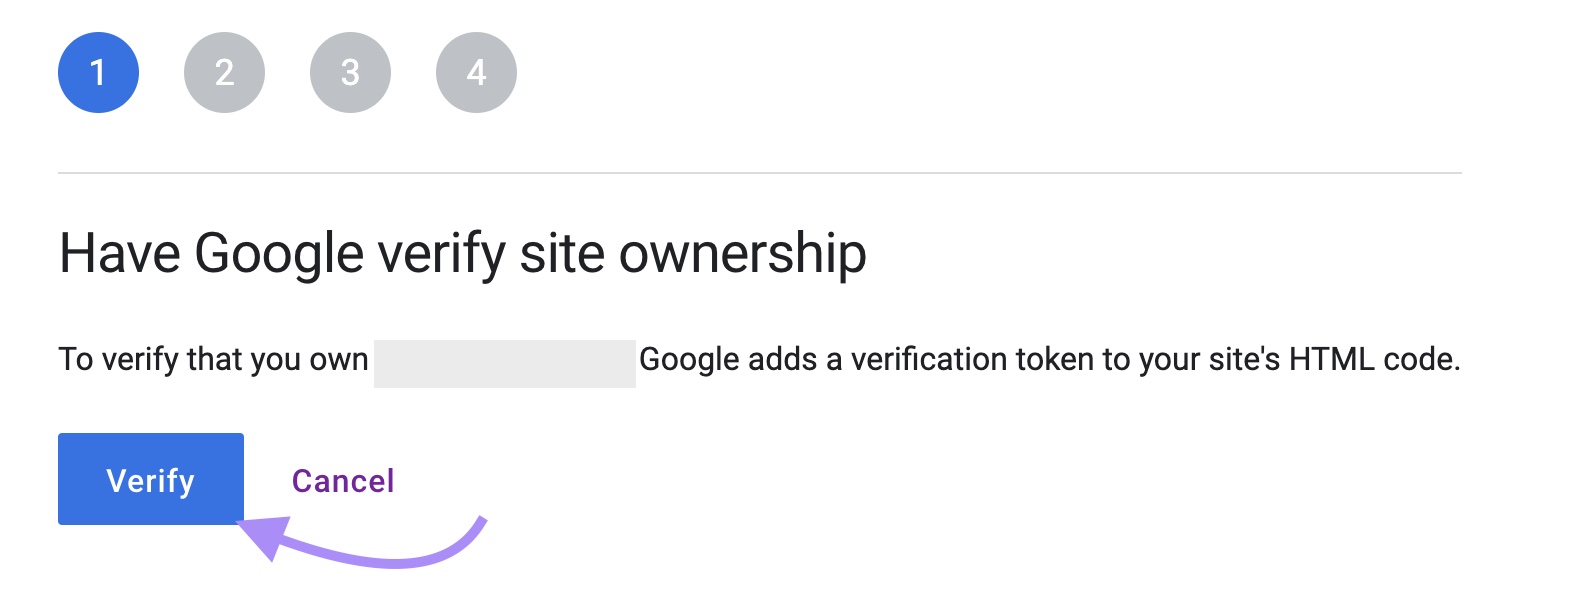
You’ll need to verify site ownership. Click “Verify.”
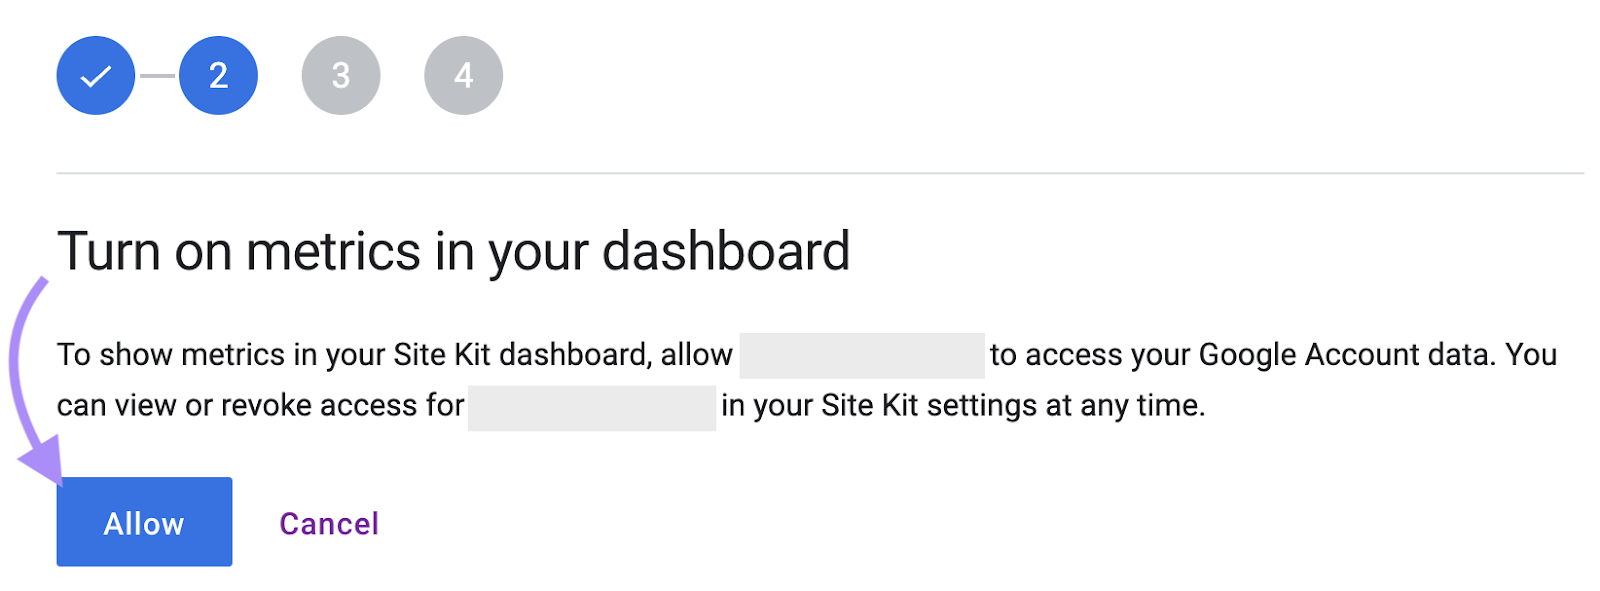
Next, turn on metrics in your dashboard by clicking “Allow.”
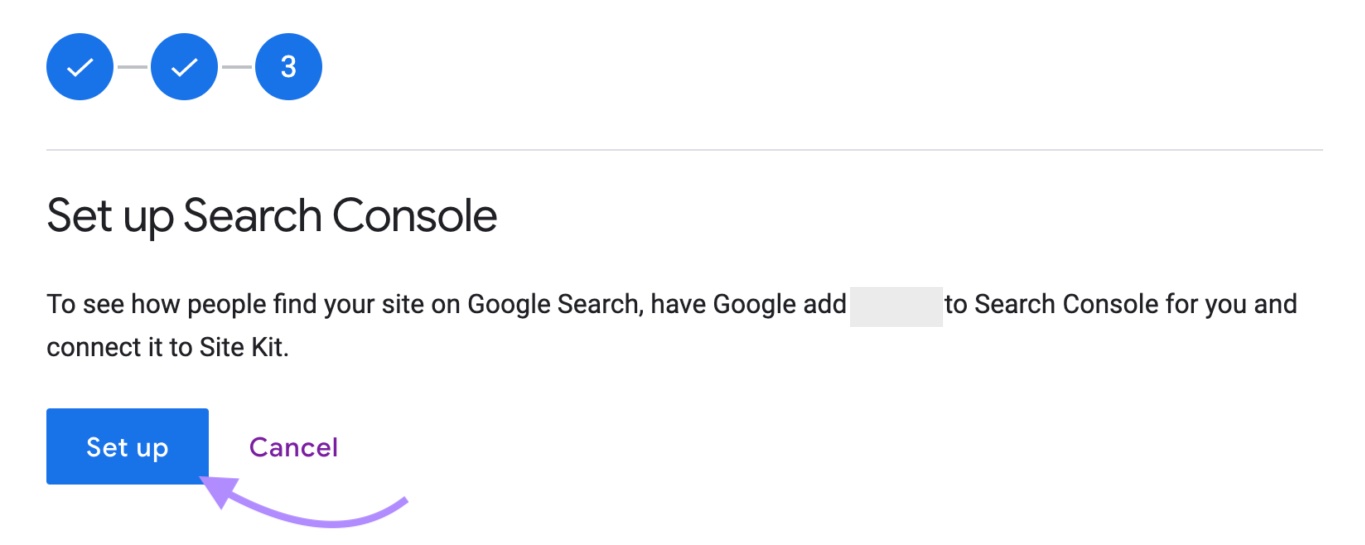
Next, add Search Console by clicking “Set up.”
Click “Next” to add Google Analytics.
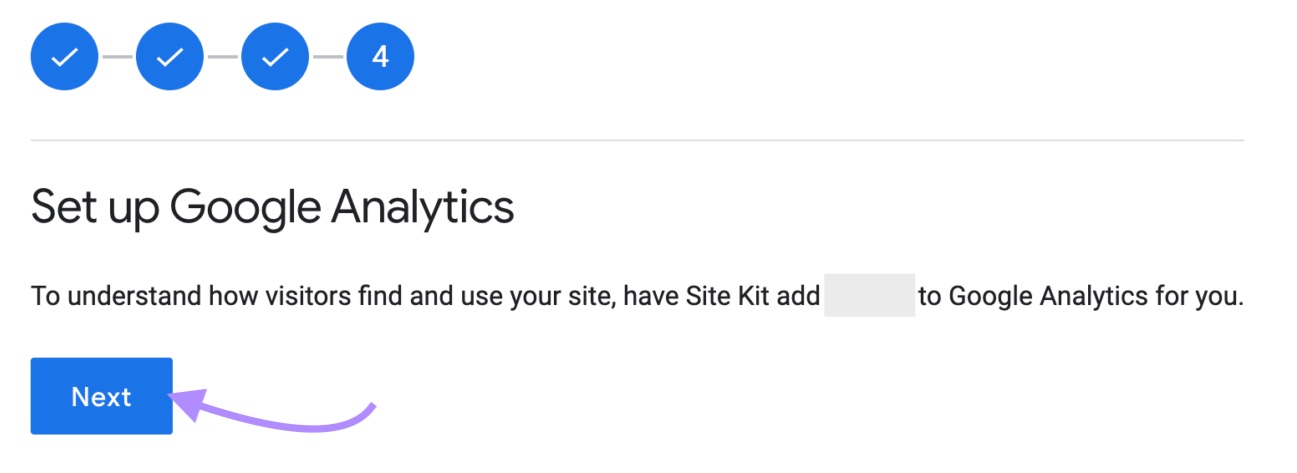
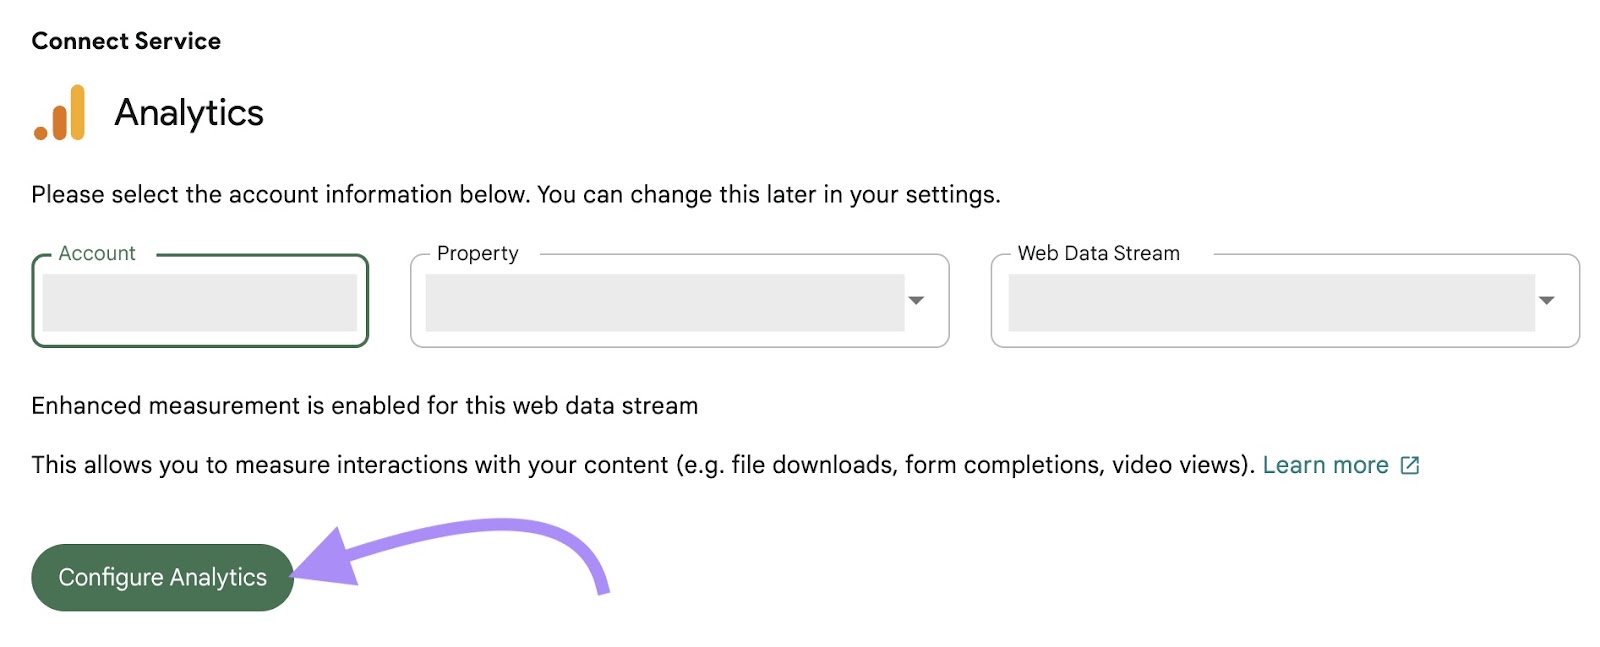
Next, select the Google Analytics property you created earlier from the drop-down menu. Then, click “Configure Analytics.”
Note: It may take up to 48 hours before your Site Kit data populates.
-
Option 3: Manually Add Tracking Code to Your Website’s Code
The third option is to copy-paste your Google tag code into your website’s code. You’ll need to add the code to every page's header.
This is the best option if you’re on the Free or Starter WordPress plans, which don’t support plugins.
For a manual installation, we recommend using a child theme to ensure updates to your WordPress theme don’t affect your tracking code.
Always back up your site before making any changes to your theme or code.
If you’re not tech-savvy, don’t worry. Just follow these steps:
Go to the “Installation Instructions” page and copy the JavaScript code snippet provided on the “Install Manually” tab.

Next, paste the code into the header of your WordPress site. Here’s how:
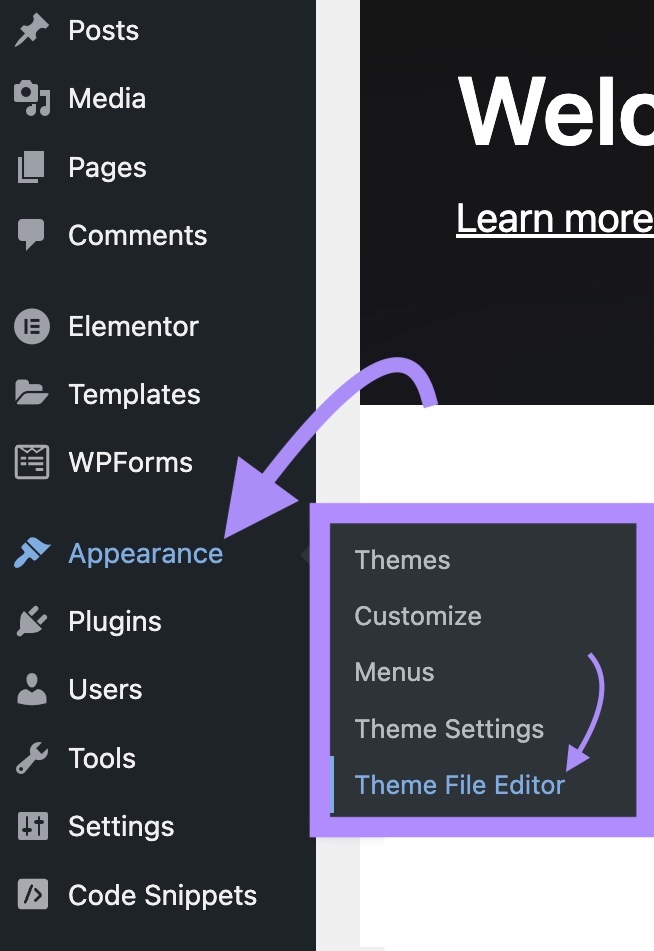
In your WordPress dashboard, click "Appearance," then "Theme File Editor."
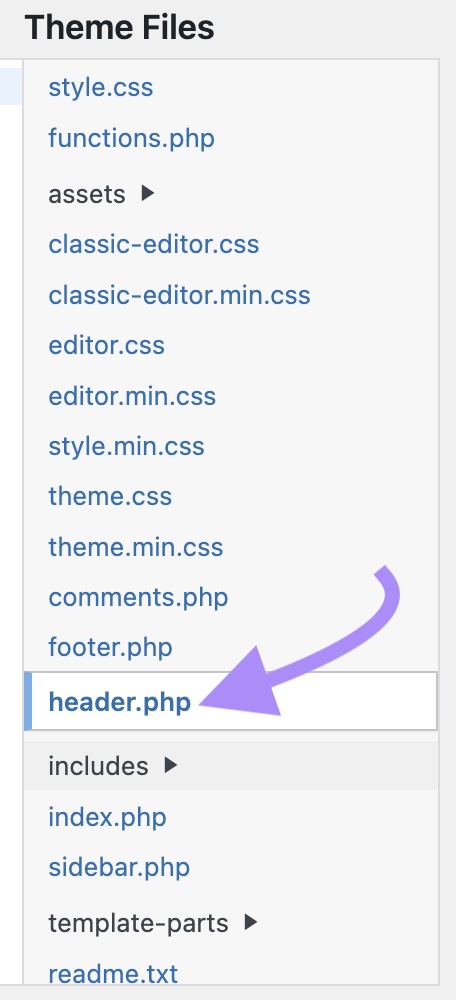
Click on the “header.php” file to edit the code.
Locate the header element, which starts with
and ends with.Paste the Google Analytics tracking code either directly after the
tag or directly before the closingtag.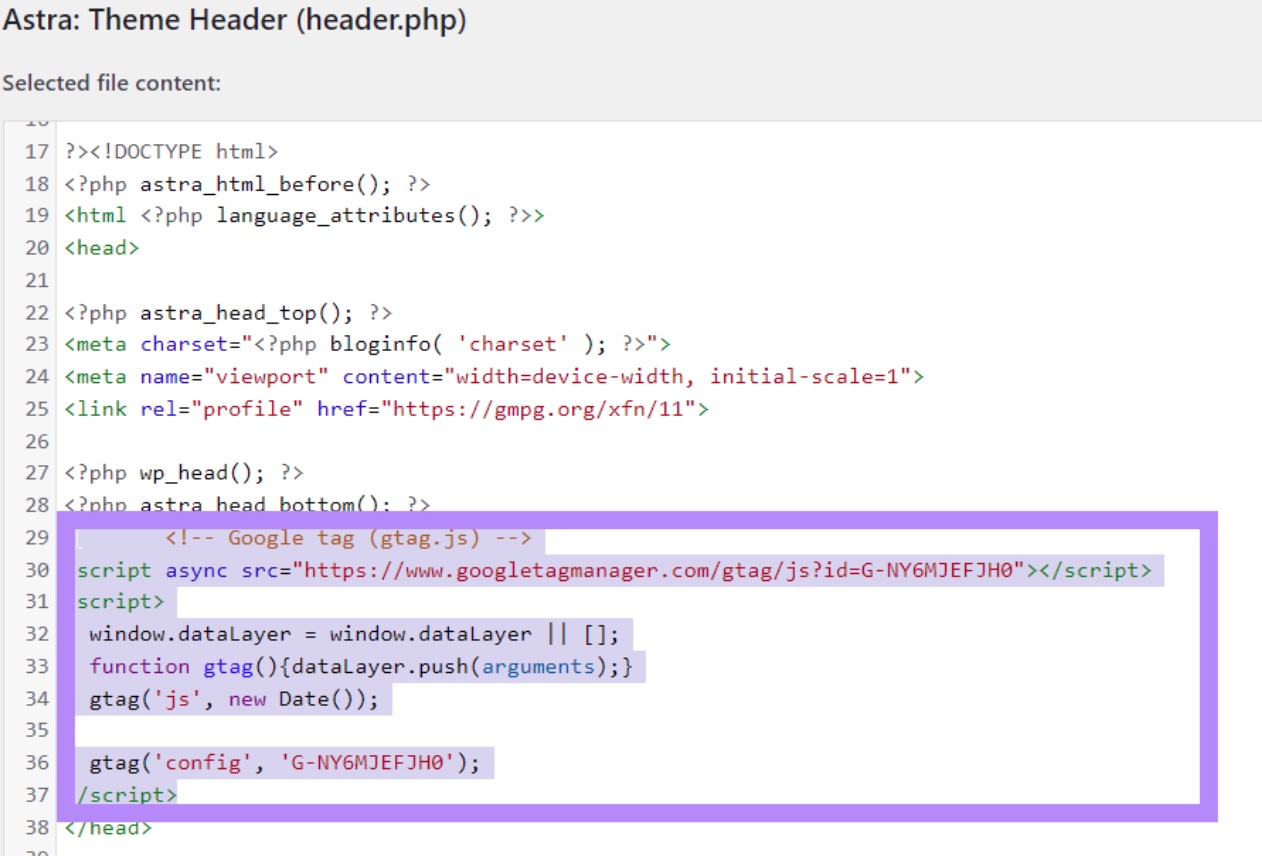
Now, repeat this on each page of your site, adding your tracking code to the header HTML of every page. Make sure you don’t add more than one Google Tag code per page.
-
Option 4: Using Google Tag Manager to Add GA4 to Your WordPress Site
Another option is to use Google Tag Manager (GTM) to add Google Analytics tracking to your website.
Google Tag Manager is a web interface that lets you deploy and update marketing tags on your website or mobile app quickly and easily. It allows you to manage both Google tags and third-party or custom tags.
First, create a Google Analytics account, set up your property and data stream, and locate your Measurement ID (or Google tag).
Next, set up your Google Tag Manager account by following our guide to setting up Google Tag Manager.
Then, configure your Google Analytics tag in Google Tag Manager.
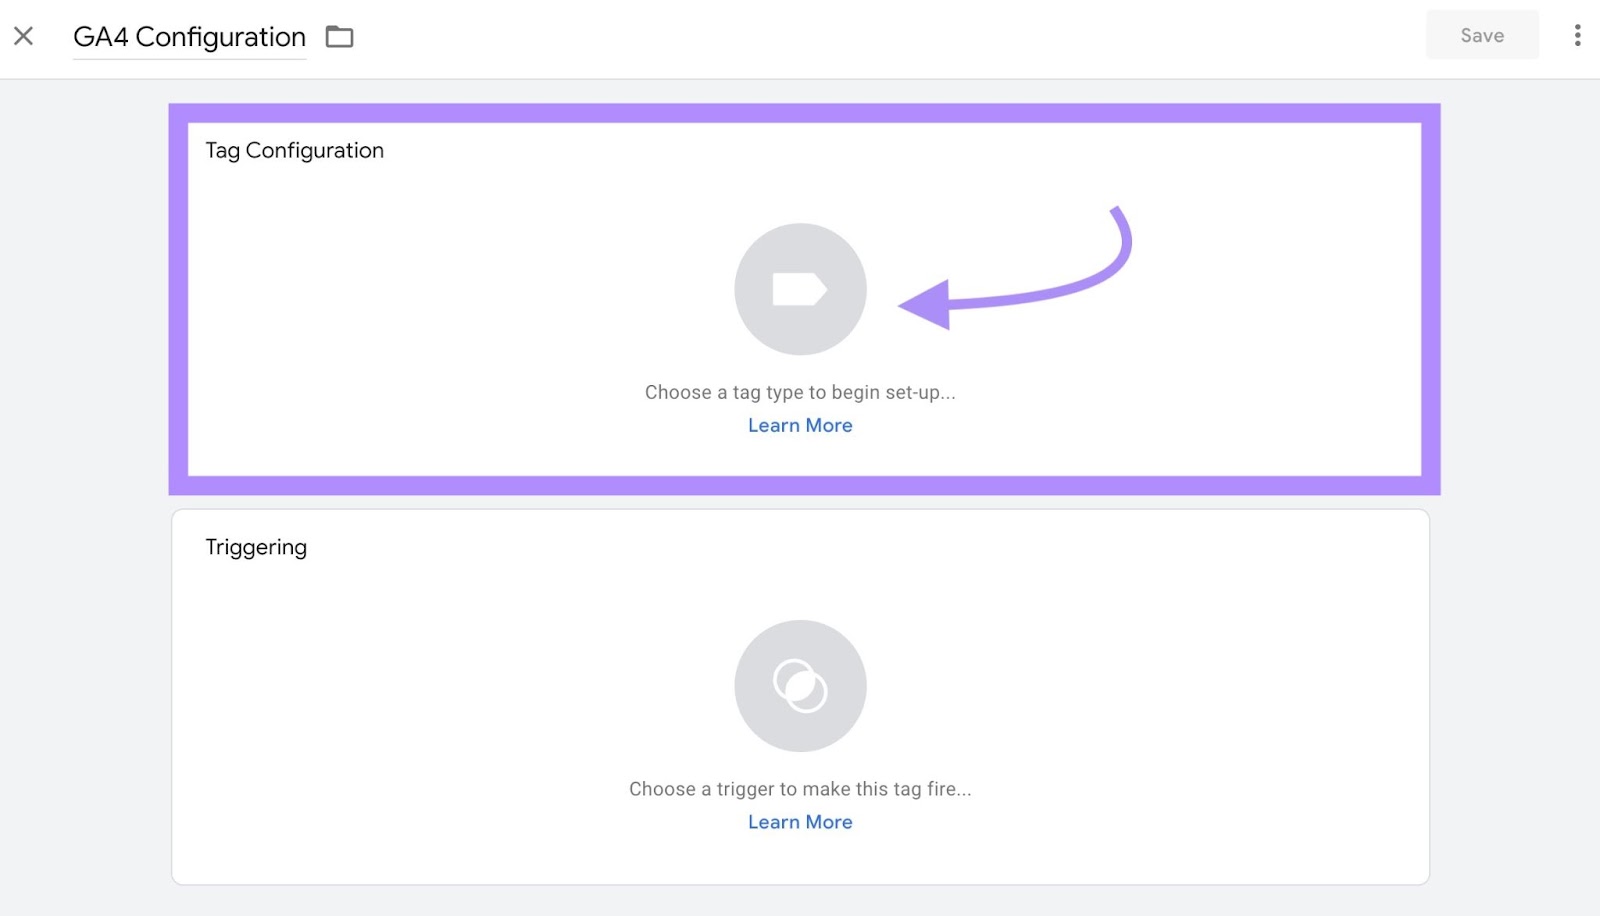
Create a new tag by clicking "Add a new tag" or "New Tag."

Give your tag a name (e.g., “GA4 Configuration”).

Then, click “Tag Configuration.
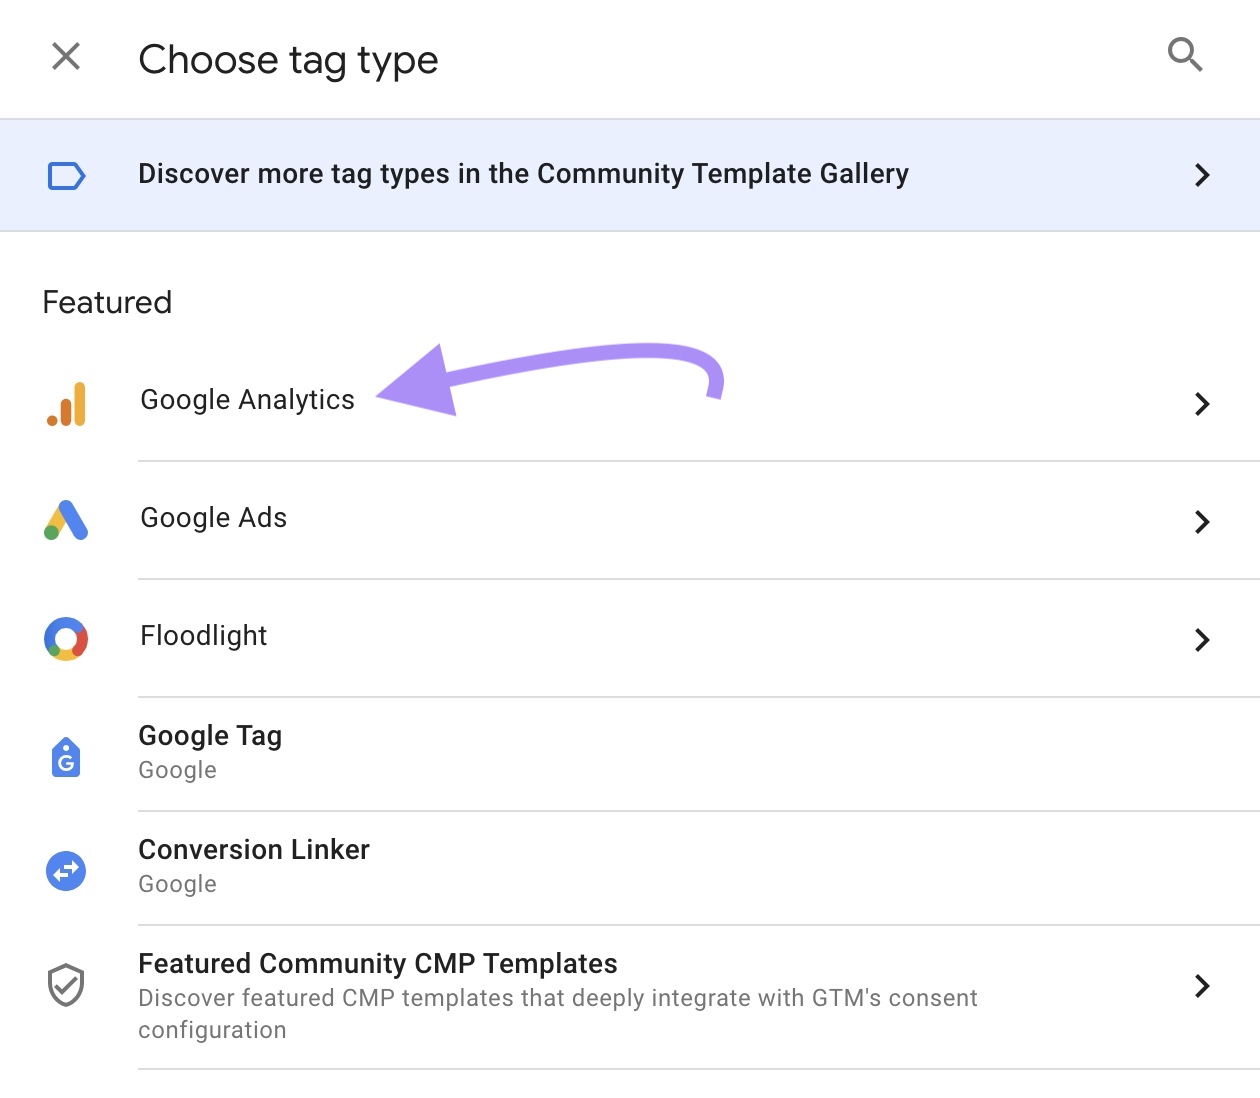
Select “Google Analytics.”
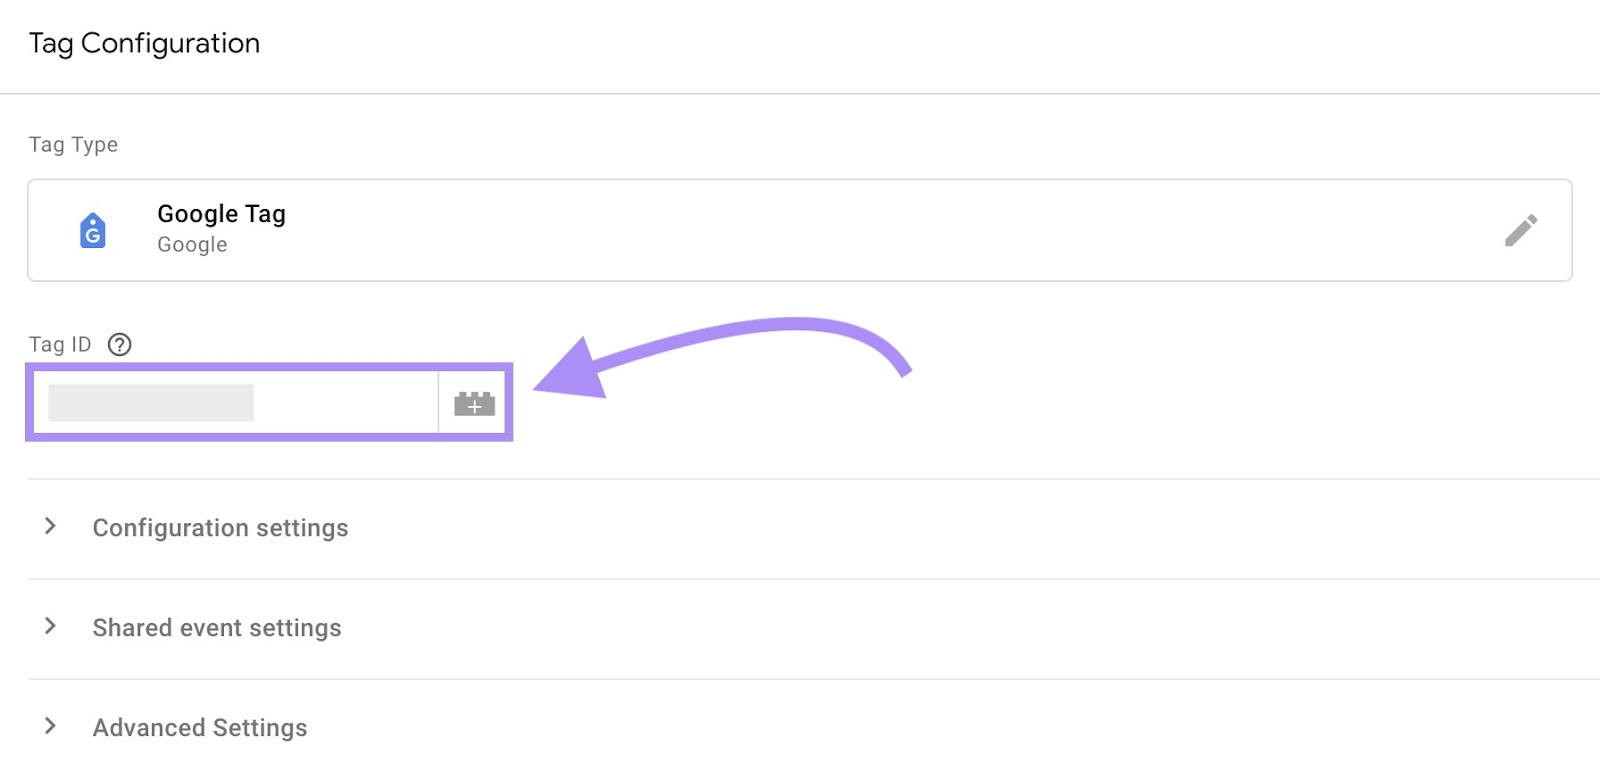
Next, click “Google Tag.”
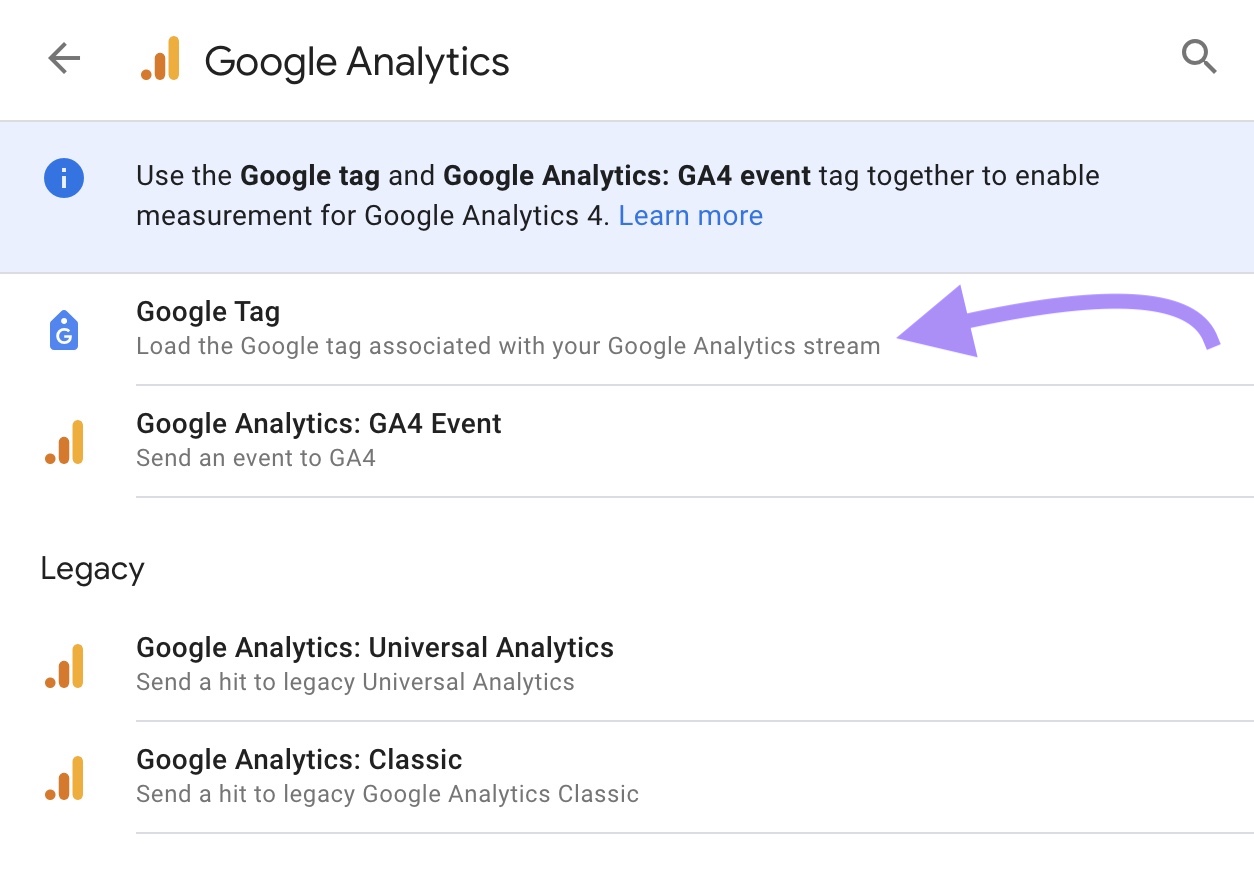
Next, paste your Measurement ID into the “Tag ID” field.
Install GTM in WordPress by adding the code snippets to your header and body text, just like in the "Manually Install Tracking Code to Your Website’s Code" section.
If you run into any trouble, refer to this handy walkthrough published by WordPress to help you add GTM to your WordPress website.
-
-
Step 3: Test Whether Google Analytics Is Collecting Data
To test if Google Analytics is active and collecting data from your WordPress site, log in to your Analytics account and navigate to your Google Analytics dashboard. If you see the data, your installation was successful.
It can take up to 48 hours for a new data stream to become active in GA4. So, don't panic if you don't see any data immediately.
Once your data stream is active, you can view the data in the "Realtime" report in your Google Analytics dashboard.

If your data stream doesn’t become active within 48 hours, use Google’s Analytics Support resource to troubleshoot your tag setup.
-
Customizing Google Analytics 4 for Your WordPress Site
You'll gain a lot of insights from Google Analytics 4 right out of the box, but using customizations can make this tool even more useful.
Customizing your data collection and reporting ensures you’re gathering and measuring all the data you need to help your business succeed.
The first step is to set up conversions for your WordPress site. A conversion can be any user action that's important to your business, such as making a purchase, submitting a contact form, downloading a free resource, or joining your mailing list.
Configure Conversions in GA4
The main way to track conversions in Google Analytics is to create or mark specific events as conversions. GA4 allows you to mark up to 30 different events as conversions.
To mark an existing event as a conversion, open the Admin menu in your Analytics account. Under "Data Display," click "Events."